Deploying Omegafold On AWS Sagemaker On A Serverless Endpoint
Published on

From Model to Mission-Critical Service
Most machine learning projects conclude with a trained model. For a production engineer, that's where the work begins. The path from a .pt or .pkl file to a reliable, scalable, and cost-effective production service is fraught with architectural trade-offs and operational complexities. This guide provides a direct, hands-on path through that complexity.
We will systematically architect and deploy a production-grade, serverless endpoint for a GPU-accelerated model, moving beyond theoretical best practices to implement a solution that is both technically robust and economically sound.
What You Will Build
By completing this guide, you will not just learn about serverless ML; you will have built a functional, enterprise-grade service that achieves:
- Sub-30-Second Inference: High performance for demanding, user-facing applications.
- 99%+ Cost Reduction: An architecture that costs nothing when idle, eliminating wasted expenditure on provisioned GPUs.
- Automated Scalability: A service that scales from zero to N instances based on real-time demand, with no manual intervention.
- Production-Grade Reliability: A system with the monitoring, error handling, and deployment patterns required for mission-critical use cases.
The Architecture at a Glance
Our entire architecture is designed to maximize managed services and minimize operational overhead. We delegate the complex, undifferentiated work of instance management, scaling, and request routing to the SageMaker platform, allowing us to focus on the core logic within our container.
┌─────────────────┐    ┌──────────────────┐    ┌─────────────────┐
│   Client Apps   │───▶│   SageMaker      │───▶│   Auto Scaling  │
│   (Universal)   │    │   Endpoint       │    │   (0-N instances)│
└─────────────────┘    └──────────────────┘    └─────────────────┘
                              │
                              ▼
                       ┌──────────────────┐
                       │   Your Custom    │
                       │   Container      │
                       │   (BYOC)         │
                       └──────────────────┘
Table of Contents
- The Serverless ML Challenge
- Solution Landscape Analysis
- SageMaker Architecture Deep Dive
- Container Engineering for ML Models
- SageMaker Deployment Patterns
- Scale-to-Zero Implementation Deep Dive
- Universal Client Access Patterns
- Monitoring and Production Best Practices
The Learning Path
This guide is structured as a progressive journey, with each chapter building on the last.
Part I: Foundations - The "Why"
- Chapter 1: The Serverless ML Challenge: We define the core engineering problem—the prohibitive cost of idle GPUs—and establish the success criteria for a viable solution.
- Chapter 2: Solution Landscape Analysis: A rigorous, no-nonsense evaluation of alternative architectures (Lambda, ECS, EC2) to justify why a purpose-built service like SageMaker is the superior choice.
- Chapter 3: SageMaker Architecture Deep Dive: We look under the hood of the SageMaker platform, understanding its internal components to make informed engineering decisions.
Part II: Implementation - The "How"
- Chapter 4: Container Engineering for ML Models: We move beyond a basic
Dockerfileto engineer a production-grade container, focusing on reliability, performance, and security. - Chapter 5: SageMaker Deployment Patterns: We automate the deployment process using Infrastructure as Code (IaC) principles and a robust validation framework.
- Chapter 6: Scale-to-Zero Implementation: A deep dive into the
ManagedInstanceScalingconfiguration that makes the entire serverless architecture possible.
Part III: Production Operations - The "Now What?"
- Chapter 7: Universal Client Access Patterns: We implement secure, robust clients to interact with our endpoint from any environment.
- Chapter 8: Monitoring and Production Best Practices: We establish the monitoring, alerting, and operational discipline required to run this service reliably in production.
Our Reference Implementation: Why OmegaFold?
Throughout this guide, we use OmegaFold, a complex protein structure prediction model, as our reference implementation. We chose it specifically because it represents a challenging class of ML models:
- It requires a GPU.
- It has a large memory footprint and a multi-gigabyte model artifact.
- Its inference is computationally intensive and long-running.
By solving for this difficult case, the patterns and principles you learn will be directly applicable to a wide range of other large-scale models.
Repository and Code
This is a hands-on guide. All code—from the Dockerfile to the Python deployment scripts—is provided and explained in full within the relevant chapters. The complete, functional code can also be found in the companion repository for reference.
Repository Link:
The Serverless ML Challenge
The Production ML Deployment Problem
Machine learning model deployment is a critical engineering discipline that exists at the nexus of computational efficiency, cost optimization, and operational reliability. Most academic and introductory ML courses conclude with a trained model, but for the production engineer, this is where the real challenge begins. Traditional deployment architectures, often inherited from standard web service paradigms, force organizations into a difficult trade-off between resource availability and operational expenditure.

Cost Structure Analysis: The Idle GPU Problem
A GPU instance, once provisioned, accrues costs regardless of its utilization. For ML models with sporadic or unpredictable traffic patterns, this leads to profound inefficiency. Let's quantify this problem.
Scenario: A ml.g4dn.xlarge instance is provisioned for serving a model.
- Cost: Approximately $1.20 per hour.
- Total Hours: 24 hours/day * 30 days/month = 720 hours.
- Always-On Monthly Cost: $1.20 * 720 = $864.
Now, consider a realistic inference workload for a specialized model:
- Daily Requests: 50
- Average Processing Time: 20 seconds per request
- Total Daily Compute Time: 50 * 20 = 1,000 seconds
- Total Monthly Compute Time: 1,000 * 30 = 30,000 seconds
The utilization percentage is therefore: ( \frac{30,000 \text{ seconds (active)}}{2,592,000 \text{ seconds (total)}} \approx 1.16% )
Conclusion: Under this common scenario, 98.84% of the expenditure on this GPU instance is wasted on idle time. This is not a sustainable economic model for scaling ML services.
The Serverless Imperative
Serverless computing directly addresses this inefficiency by shifting from a provisioned-resource model to a pay-per-request execution model. For ML workloads, a true serverless architecture must provide:
- On-Demand Provisioning: Compute resources are allocated only when an inference request is received.
- Automatic Scaling: The platform must scale from 0 to N instances based on real-time demand, without manual intervention.
- Proportional Costing: Financial outlay must be directly proportional to the compute resources consumed during active inference.
Technical Barriers to Serverless ML
While the serverless paradigm is mature for stateless, short-lived functions, its application to ML inference presents significant technical hurdles.
1. Cold Start Latency
The "cold start" problem—the time required to provision a new instance and prepare it for its first request—is the most significant barrier. For a large ML model, this is not a trivial delay.
Typical Cold Start Breakdown for a GPU Model:
- Instance Provisioning: 15-30 seconds (OS boot, network attachment)
- Container Initialization: 5-10 seconds (image pull, runtime startup)
- Model Loading: 10-45 seconds (deserializing multi-gigabyte weights into GPU memory)
- Total Cold Start Penalty: 30-85 seconds
An 85-second delay is unacceptable for any interactive application and inefficient even for many asynchronous workflows. A viable serverless ML platform must manage this latency down to an acceptable threshold.
2. Resource Requirements Mismatch
Standard serverless platforms like AWS Lambda were not designed for the resource demands of deep learning models.
| Requirement | Typical ML Model | Standard Serverless Platform | Verdict | |---|---|---|---| | Memory | 4-32 GB | 512 MB - 10 GB | Mismatch | | GPU Access | Essential | Not Available | Mismatch | | Execution Timeout | 30s - 5 min | 15 min max | Potentially problematic | | Container Size | 5-20 GB | 10 GB max | Mismatch |
These limitations make general-purpose serverless platforms unsuitable for deploying large, GPU-accelerated models.
3. State Management Complexity
Serverless functions are ideally stateless. ML inference, however, is an inherently stateful operation. The "state" is the initialized model itself, which is expensive to create.
# Conceptual representation of an ML inference state
class MLInferenceState:
    def __init__(self, model_path: str):
        self.model = None          # e.g., a 10GB PyTorch model in GPU memory
        self.tokenizer = None      # Text processing state
        self.gpu_context = None    # CUDA context
        self.cache = {}            # Optimization cache

    def warm_up(self):
        """
        An expensive, time-consuming operation to establish the ready state.
        This cannot be efficiently repeated for every request.
        """
        self.model = self.load_model_to_gpu()      # 10-45 seconds
        self.tokenizer = self.load_tokenizer()      # 1-2 seconds
        self.gpu_context = self.initialize_cuda()   # 2-5 seconds
The core architectural challenge is to maintain this expensive state across multiple requests while still benefiting from a scale-to-zero cost model for idle periods.
Defining the Engineering Problem
Based on this analysis, we can define a precise engineering problem statement.

Objective: To architect and implement a production-grade, serverless deployment for a computationally intensive ML model (e.g., OmegaFold) that requires GPU acceleration.
Key Constraints:
- The model requires a GPU (e.g., NVIDIA T4 or A10G).
- Inference latency can range from 10 to 120 seconds.
- Request traffic is highly variable, with long idle periods.
- Container image size is expected to be >10 GB.
- End-user tolerance for cold start latency is under 60 seconds.
Success Metrics:
- Cost Efficiency: Achieve >95% cost reduction compared to an equivalent always-on instance.
- Performance: Maintain a p95 latency of <30 seconds for warm requests.
- Scalability: Automatically scale from 0 to N instances with no operational intervention.
- Reliability: Maintain a >99.9% success rate for valid requests.
The subsequent chapters of this guide will systematically solve this problem, starting with an analysis of available AWS solutions and culminating in a complete, production-ready implementation using Amazon SageMaker.
Code Example: Cost Calculator
#!/usr/bin/env python3
"""
Serverless ML Cost Analysis Tool
Compare traditional vs serverless deployment costs
"""

def calculate_traditional_cost(instance_cost_per_hour, utilization_percent):
    """Calculate always-on deployment cost"""
    hours_per_month = 24 * 30
    monthly_cost = instance_cost_per_hour * hours_per_month
    wasted_cost = monthly_cost * (1 - utilization_percent / 100)

    return {
        'monthly_cost': monthly_cost,
        'wasted_cost': wasted_cost,
        'utilization': utilization_percent
    }

def calculate_serverless_cost(requests_per_month, avg_processing_seconds, cost_per_hour):
    """Calculate serverless deployment cost"""
    total_processing_hours = (requests_per_month * avg_processing_seconds) / 3600
    monthly_cost = total_processing_hours * cost_per_hour

    return {
        'monthly_cost': monthly_cost,
        'processing_hours': total_processing_hours,
        'requests': requests_per_month
    }

# Example calculation
traditional = calculate_traditional_cost(1.20, 1.16)  # ml.g4dn.xlarge, 1.16% utilization
serverless = calculate_serverless_cost(1500, 20, 1.20)  # 1500 requests/month, 20s each

print(f"Traditional cost: ${traditional['monthly_cost']:.2f}")
print(f"Serverless cost: ${serverless['monthly_cost']:.2f}")
print(f"Savings: {((traditional['monthly_cost'] - serverless['monthly_cost']) / traditional['monthly_cost'] * 100):.1f}%")
Solution Landscape Analysis
An Engineer's Framework for Evaluation
Before committing to a platform, a production engineer must systematically evaluate the available options. A hastily chosen architecture can lead to unmanageable complexity, runaway costs, or performance bottlenecks that are difficult to re-engineer post-launch. This chapter provides a rigorous, weighted analysis of four primary serverless architecture patterns on AWS, measured against the specific demands of GPU-accelerated ML inference.

Weighted Evaluation Criteria
Our evaluation framework prioritizes feasibility and performance. A solution that fails to meet the core requirements of GPU access and resource limits is non-viable, regardless of its other merits.
| Dimension | Weight | Rationale | |---|---|---| | GPU Support | Critical | Non-negotiable for modern deep learning models. | | Resource Limits | Critical | Must accommodate multi-gigabyte models and memory footprints. | | Cost Model | High | The degree to which the model approaches true pay-per-use. | | Cold Start Latency | High | Directly impacts user experience and system responsiveness. | | Operational Complexity | Medium | The engineering effort required for maintenance and operation. | | Ecosystem Integration | Low | Assumed high for all AWS-native solutions; less of a differentiator. |
Alternative Architectures and Their Trade-Offs
Pattern 1: API Gateway + Lambda (The Fan-Out Pattern)
This is a common serverless pattern for general-purpose computing, but its application to ML inference requires significant modification.
Architecture:
Client → API Gateway → Lambda Function → [External GPU Service e.g., ECS/EC2]
Intended Use-Case: This architecture excels at decoupling lightweight, event-driven business logic (e.g., request validation, user authentication) from heavyweight, long-running tasks. The Lambda function acts as a fast, scalable routing layer.
Technical Assessment:
| Capability | Rating | In-Depth Analysis | |---|---|---| | GPU Support | ❌ None | This is the critical failure. Lambda has no native GPU access, forcing the architecture to delegate the core ML task to a separate, non-serverless GPU fleet (ECS or EC2). | | Resource Limits | ⚠️ Limited | While sufficient for a routing function, the 10GB memory and 15-minute timeout are irrelevant as the primary workload runs elsewhere. | | Cold Start | ✅ Excellent | Lambda's 1-5 second cold start is ideal for the routing component, but the user still suffers the cold start of the backend GPU service. | | Cost Model | ⚠️ Deceptive | You achieve pay-per-request for the Lambda function, but the expensive GPU resources are likely not truly serverless, negating the primary economic advantage. | | Complexity | ❌ High | This pattern introduces significant complexity: managing a separate compute fleet, handling inter-service networking and authentication, and coordinating disparate scaling policies. |
Verdict: Non-viable. This pattern introduces the complexity of a microservices architecture without delivering the core benefit of serverless ML inference. It essentially uses a serverless component to call a non-serverless one.
Pattern 2: ECS Fargate with Auto Scaling
Fargate abstracts away the underlying EC2 instances for container orchestration, representing a step towards serverless container management.
Architecture:
Client → Application Load Balancer (ALB) → ECS Service → Fargate Tasks (GPU)
Intended Use-Case: Designed for long-running containerized applications (e.g., web services, APIs) where engineers want to avoid managing the underlying server fleet.
Technical Assessment:
| Capability | Rating | In-Depth Analysis | |---|---|---| | GPU Support | ⚠️ Limited | GPU support on Fargate is relatively new, often lags behind the latest instance types, and comes at a pricing premium. It is not its primary design center. | | Resource Limits | ✅ Good | Supports up to 16 vCPUs and 120GiB of memory, sufficient for many ML models. | | Cold Start | ❌ Poor | Provisioning a new Fargate task with GPU resources can take 2-5 minutes. This is far too slow for interactive use cases. | | Cost Model | ⚠️ Limited | Fargate bills for vCPU and memory per second, but only while a task is running. While it can scale to zero tasks, the long startup time discourages this for any latency-sensitive application. | | Complexity | ⚠️ Medium | Requires manual configuration of an Application Load Balancer, VPC networking, task definitions, and service scaling policies. |
Verdict: Unsuitable for responsive inference. The cold start latency makes true scale-to-zero economically attractive but practically unusable. It remains a better fit for asynchronous, delay-tolerant batch processing.
Pattern 3: EC2 Auto Scaling Groups (The Classic Approach)
This is the traditional, non-serverless method for managing scalable compute resources. It offers maximum control at the cost of maximum operational overhead.
Architecture:
Client → Application Load Balancer (ALB) → EC2 Auto Scaling Group → GPU Instances
Intended Use-Case: The foundational pattern for scalable, fault-tolerant applications on AWS. It provides complete control over the compute environment.
Technical Assessment:
| Capability | Rating | In-Depth Analysis | |---|---|---| | GPU Support | ✅ Excellent | Full, immediate access to the entire portfolio of EC2 GPU instances. | | Resource Limits | ✅ Excellent | Effectively unlimited; constrained only by your service quotas. | | Cold Start | ❌ Poor | The time required to boot a full EC2 instance, including OS initialization and agent setup, is 3-8 minutes. | | Cost Model | ❌ Poor | Billing is per-instance-hour. Even with scale-to-zero, the long boot time means you must either tolerate extreme latency or maintain a pool of warm instances, defeating the purpose. | | Complexity | ❌ High | The engineer is responsible for everything: managing AMIs, OS patching, security groups, load balancer configuration, health checks, and complex scaling policies. |
Verdict: Inefficient and operationally burdensome. This pattern represents the baseline against which serverless solutions should be measured. While it can be made to work, it is the antithesis of a serverless model.
Pattern 4: SageMaker Real-time Endpoints
This is AWS's purpose-built solution for deploying ML models as scalable, managed endpoints.
Architecture:
Client → SageMaker Runtime API → Managed Endpoint → Container on GPU Instance
Intended Use-Case: Specifically designed to host ML models as secure, scalable, and fully managed REST APIs.
Technical Assessment:
| Capability | Rating | In-Depth Analysis |
|---|---|---|
| GPU Support | ✅ Excellent | Native, first-class support for all relevant ml.* instance families, optimized for ML workloads. |
| Resource Limits | ✅ Excellent | Accommodates large containers and provides instances with up to 384 GB of memory and 8 GPUs. |
| Cold Start | ✅ Good | 30-60 seconds. This is a significant improvement over EC2/ECS and is achieved through platform-level optimizations like pre-warmed instance pools and optimized AMIs. |
| Cost Model | ✅ Excellent | With ManagedInstanceScaling, SageMaker provides true serverless billing. You are charged per-second for inference compute time only, with zero cost for idle time. |
| Complexity | ✅ Excellent | Fully managed service. SageMaker handles load balancing, health checks, instance provisioning, and auto-scaling, allowing the engineer to focus solely on the container. |
Verdict: Optimal Solution. SageMaker directly addresses the critical failures of other architectures. It is the only solution that provides the resource environment required for large ML models within a true serverless economic and operational model.
Quantitative Decision Matrix
To formalize our recommendation, we apply the weighted evaluation framework.
def calculate_solution_scores():
    # Weights prioritize feasibility (GPU, Resources) and performance (Cost, Latency)
    weights = {
        'gpu_support': 0.25, 'resource_limits': 0.20, 'cost_model': 0.20,
        'cold_start': 0.15, 'complexity': 0.15, 'integration': 0.05
    }

    # Scores (out of 10) reflect the analysis above
    scores = {
        'Lambda + Fan-Out': {'gpu_support': 1, 'resource_limits': 3, 'cost_model': 4,
                             'cold_start': 9, 'complexity': 2, 'integration': 8},
        'ECS Fargate':      {'gpu_support': 4, 'resource_limits': 7, 'cost_model': 6,
                             'cold_start': 3, 'complexity': 5, 'integration': 7},
        'EC2 Auto Scaling': {'gpu_support': 9, 'resource_limits': 9, 'cost_model': 2,
                             'cold_start': 2, 'complexity': 2, 'integration': 6},
        'SageMaker Endpoint':{'gpu_support': 9, 'resource_limits': 9, 'cost_model': 9,
                             'cold_start': 7, 'complexity': 9, 'integration': 9}
    }

    # Calculate final weighted scores
    final_scores = {
        solution: sum(weights[metric] * score for metric, score in metrics.items())
        for solution, metrics in scores.items()
    }

    return final_scores

# Expected Results:
# SageMaker Endpoint: 8.5
# EC2 Auto Scaling: 4.8
# ECS Fargate: 5.1
# Lambda + Fan-Out: 4.15
Final Recommendation
The quantitative analysis confirms our qualitative assessment. SageMaker Real-time Endpoints with ManagedInstanceScaling is the superior architecture. It provides the necessary technical capabilities (native GPU support, high resource limits) within a managed, cost-effective, and operationally simple framework. The subsequent chapters of this guide will focus exclusively on the production implementation of this pattern.
SageMaker Architecture Deep Dive
A Three-Layered Architecture
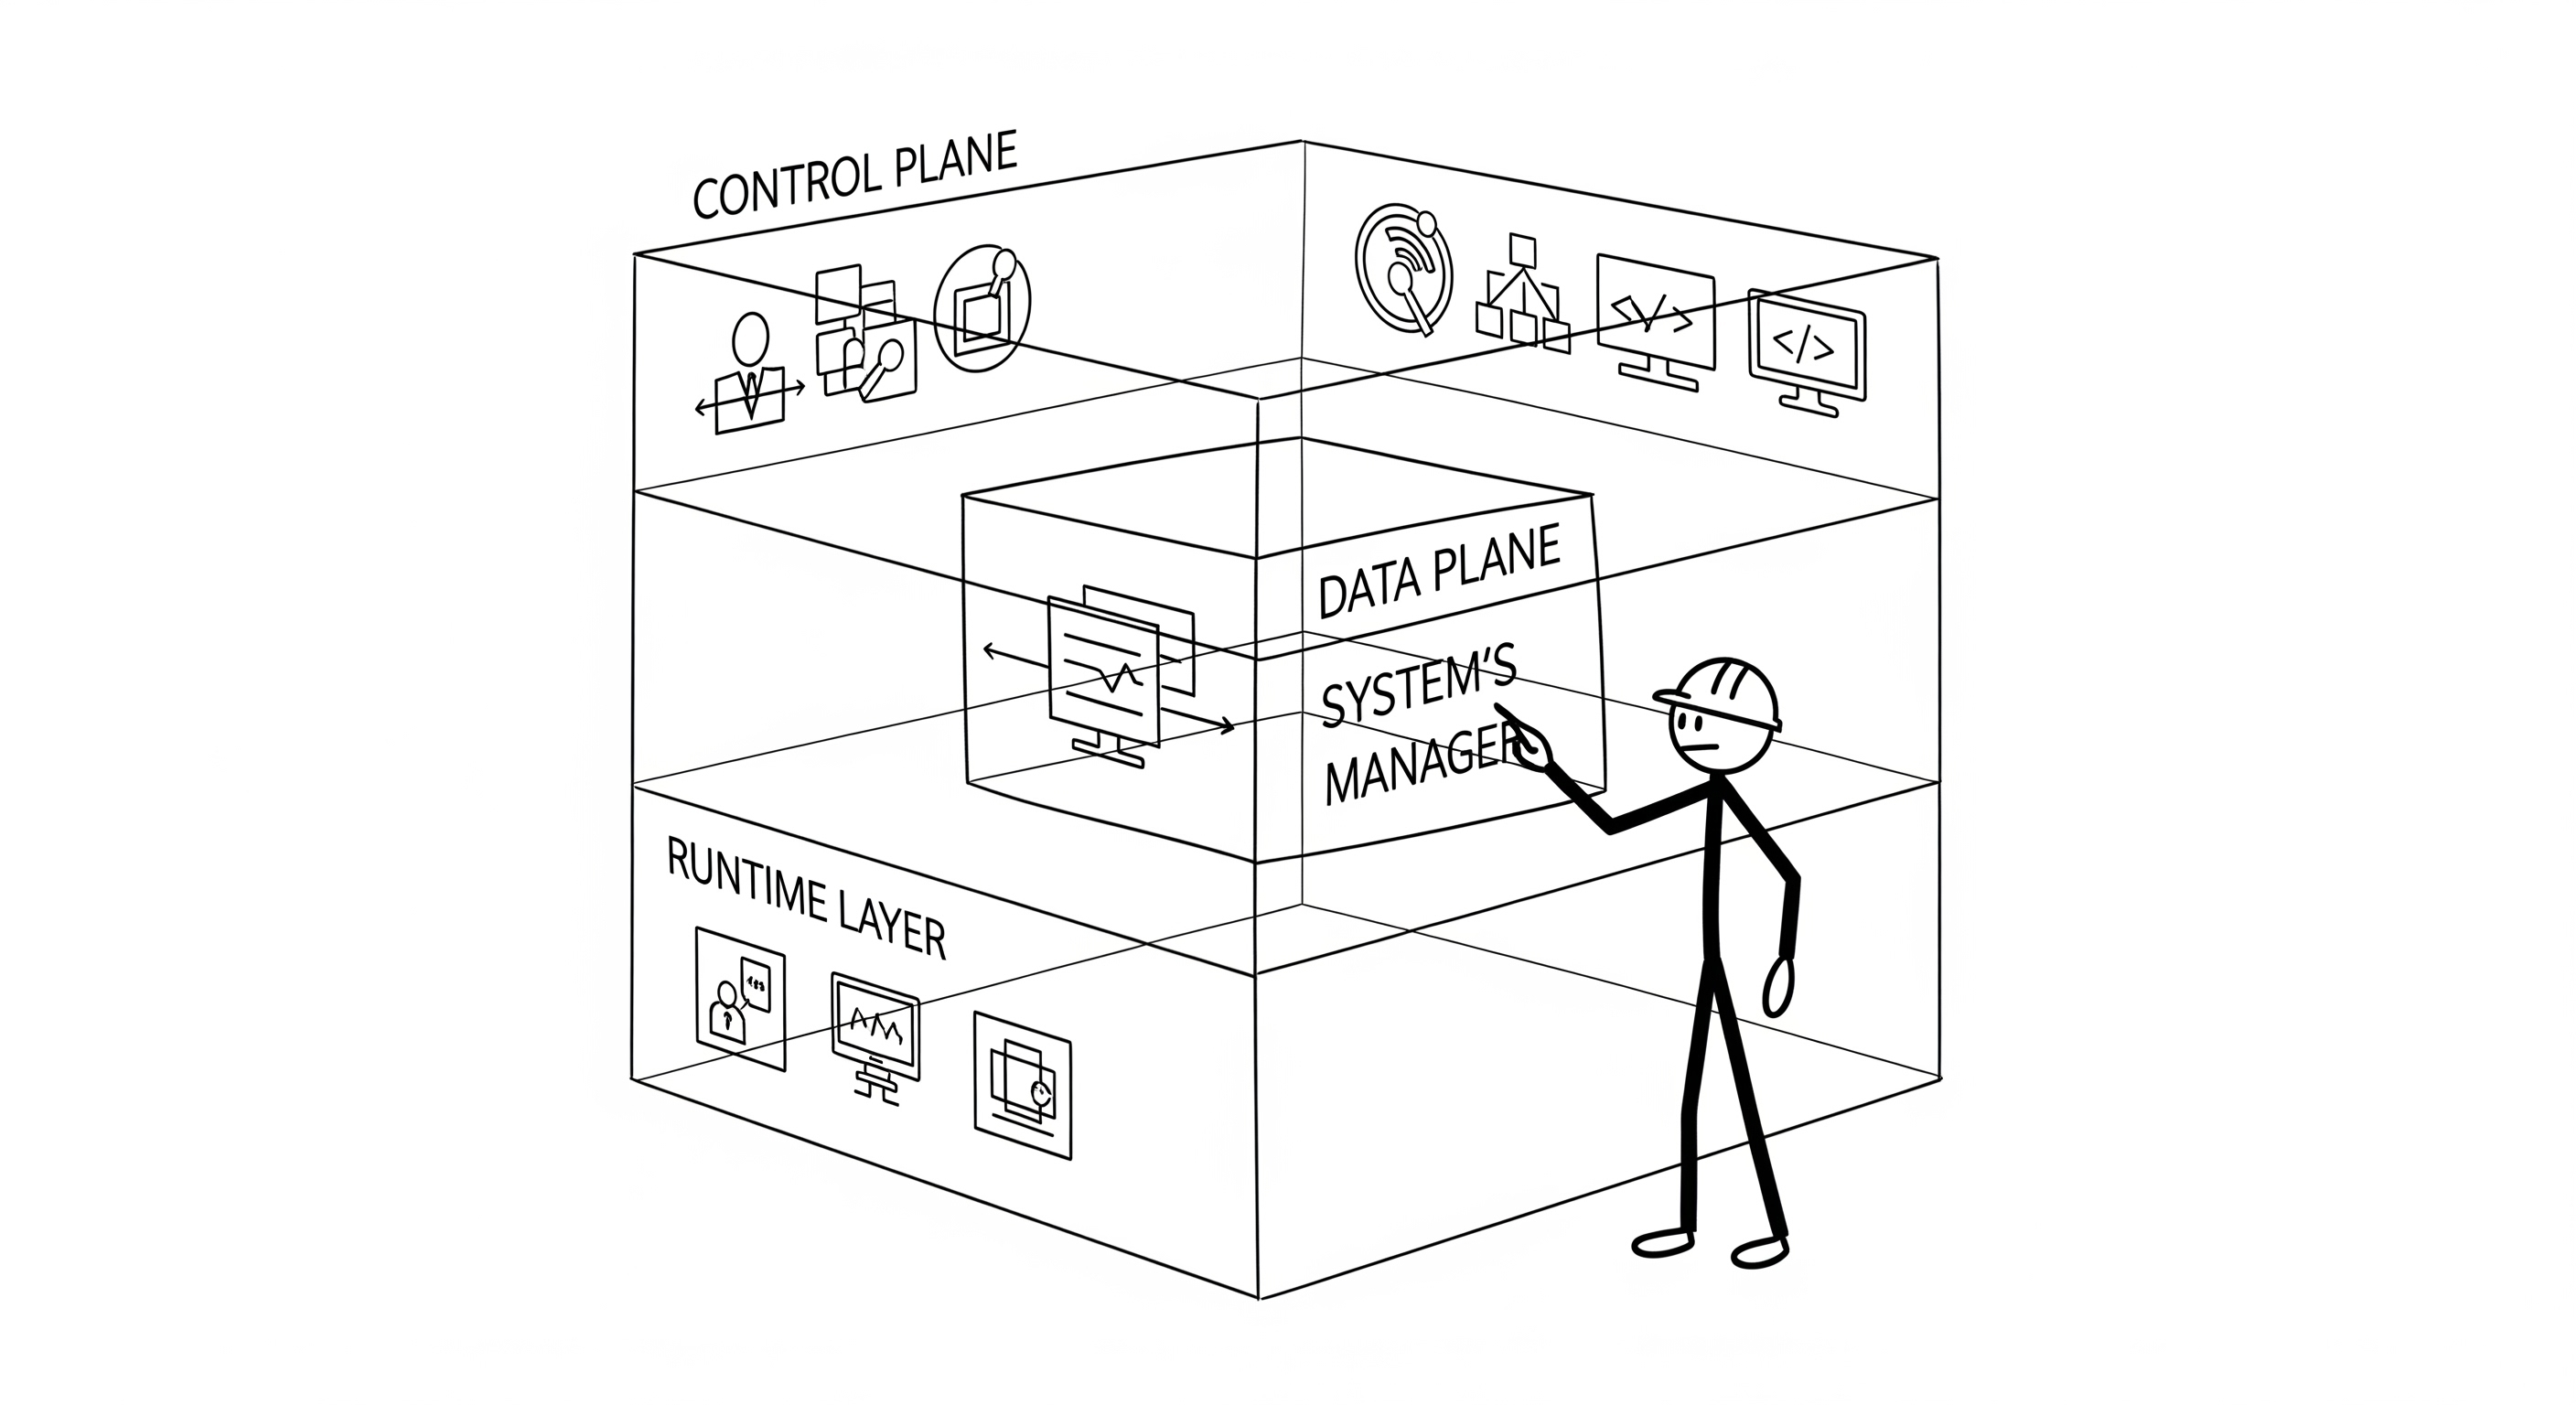
To effectively deploy models on SageMaker, it's crucial to understand its architecture not as a monolith, but as a system of three distinct, interacting layers. Each layer has a specific responsibility, and mastering their interplay is key to building reliable, high-performance endpoints.
┌─────────────────────────────────────────────────────────────────┐
│          [1] SageMaker Control Plane (The "Brain")              │
├─────────────────────────────────────────────────────────────────┤
│ Model Registry │ Endpoint Config │ Auto Scaling │ Monitoring    │
└─────────────────────────────────────────────────────────────────┘
                                 │ (API Calls)
┌─────────────────────────────────────────────────────────────────┐
│            [2] SageMaker Data Plane (The "Manager")             │
├─────────────────────────────────────────────────────────────────┤
│        Real-time Endpoints       │     Batch Transform         │
│  ┌─────────────────────────────┐  │  ┌─────────────────────────┐ │
│  │   Instance Pool Manager     │  │  │   Job Manager           │ │
│  │   ├─ Load Balancer         │  │  │   ├─ Resource Scheduler │ │
│  │   ├─ Health Monitor        │  │  │   └─ Result Aggregator  │ │
│  │   └─ Auto Scaler           │  │  └─────────────────────────┘ │
│  └─────────────────────────────┘  │                            │
└─────────────────────────────────────────────────────────────────┘
                                 │ (Instance Provisioning)
┌─────────────────────────────────────────────────────────────────┐
│           [3] Container Runtime Layer (The "Worker")            │
├─────────────────────────────────────────────────────────────────┤
│  EC2 Instance (ml.g4dn.xlarge)  │  EC2 Instance (ml.g4dn.xlarge)│
│  ├─ Docker Runtime              │  ├─ Docker Runtime            │
│  ├─ CUDA Driver Stack           │  ├─ CUDA Driver Stack         │
│  ├─ SageMaker Agent             │  ├─ SageMaker Agent           │
│  └─ Your Model Container        │  └─ Your Model Container      │
└─────────────────────────────────────────────────────────────────┘
- Control Plane: The high-level API layer where you define resources (Models, Endpoint Configurations). This is your primary interface.
- Data Plane: The managed service layer that executes the deployment. It handles instance provisioning, health checks, and request routing. You don't interact with it directly, but you configure its behavior via the Control Plane.
- Runtime Layer: The fleet of EC2 instances where your container actually runs. This is the compute layer.
The Cold Start Sequence: A Deeper Look
Understanding the ~45-second cold start is critical for setting performance expectations. It is not a random delay but a sequence of discrete engineering steps performed by the SageMaker Data Plane.
def sagemaker_cold_start_pipeline():
    """A conceptual model of the instance provisioning sequence."""

    # Phase 1: Instance Provisioning (15-30 seconds)
    # The Data Plane requests a new EC2 instance from the underlying fleet.
    # This involves OS boot, network interface attachment, and EBS volume mounting.
    instance = ec2.launch_instance(
        instance_type='ml.g4dn.xlarge',
        ami_id='ami-sagemaker-inference-gpu-optimized', # A specialized, lean AMI
        security_groups=['sg-sagemaker-internal']
    )

    # Phase 2: Agent & Container Runtime Setup (5-10 seconds)
    # The SageMaker agent bootstraps on the instance.
    # It authenticates with ECR and pulls the specified container image.
    agent = SageMakerAgent(instance)
    agent.pull_container_image(ecr_uri)

    # Phase 3: Your Container Bootstrap (10-20 seconds)
    # Docker starts your container. The 'serve' script executes.
    # This is where your model loading (e.g., into GPU memory) occurs.
    container = DockerContainer(image=ecr_uri, gpu_access=True)
    container.run_entrypoint() # Executes your 'serve' script and Flask app

    # Phase 4: Health Check Validation (5 seconds)
    # The Data Plane continuously pings the /ping endpoint of your container.
    # Once a 200 OK is received, the instance is marked as 'InService'
    # and added to the load balancer's pool.
    if container.get_health_status() == "Healthy":
        load_balancer.add_to_pool(instance.ip)
Engineer's Note: The single most important factor you control in this sequence is Phase 3. The efficiency of your container's startup script and model loading process directly impacts the cold start time. An inefficient loading mechanism can easily double this phase's duration.
ManagedInstanceScaling: The Scaling Engine
SageMaker's ManagedInstanceScaling is more sophisticated than simple CPU or memory-based scaling. It is designed around inference throughput.
The Scaling Algorithm
The core logic attempts to maintain a target number of invocations per minute for each active instance.
class ManagedInstanceScalingLogic:
    def __init__(self, policy_config):
        # e.g., TargetValue = 70.0 from 'SageMakerVariantInvocationsPerInstance'
        self.target_invocations_per_minute = policy_config['TargetValue']
        self.scale_in_cooldown_seconds = policy_config.get('ScaleInCooldown', 900)
        self.scale_out_cooldown_seconds = policy_config.get('ScaleOutCooldown', 300)
        self.last_request_timestamp = time.time()

    def calculate_desired_instances(self, current_invocations_per_minute, current_instance_count):
        """Calculates the optimal number of instances for the current load."""

        # Rule 1: Scale-to-Zero Logic
        if current_invocations_per_minute == 0:
            idle_time = time.time() - self.last_request_timestamp
            if idle_time > self.scale_in_cooldown_seconds:
                return 0 # Trigger scale-down to zero
            else:
                return current_instance_count # Respect cooldown period

        # Rule 2: Scale-Up Logic
        # Calculate the ideal number of instances needed to bring the load
        # of each instance down to the target value.
        desired_instances = math.ceil(
            (current_invocations_per_minute / self.target_invocations_per_minute) * current_instance_count
        )

        return desired_instances
Architect's Note: The
ScaleInCooldown(e.g., 15 minutes) is a critical parameter. It prevents "flapping"—where an instance is terminated and then immediately requested again due to fluctuating traffic. It acts as a stability buffer, trading slightly higher cost for higher availability and lower average latency for bursty traffic patterns.
The BYOC Contract: Your End of the Bargain
When you use the "Bring Your Own Container" (BYOC) pattern, you are entering into a service contract with the SageMaker platform. Your container must adhere to this contract for the system to function.

The Required Interface
-
/ping(GET request): This is the health check. SageMaker's Data Plane will call this endpoint constantly.- Requirement: Must return an HTTP
200 OKwithin 2 seconds. - Failure Consequence: If it fails or times out, the Data Plane will consider the container unhealthy, terminate the instance, and replace it. This is a common source of deployment failures.
- Requirement: Must return an HTTP
-
/invocations(POST request): This is the inference handler.- Requirement: Must accept the data format you intend to send and return a result. SageMaker is agnostic to the content, but the HTTP transaction must complete successfully.
- Failure Consequence: HTTP
5xxerrors returned from this endpoint will be logged to CloudWatch asInvocation5XXErrorsand can trigger alarms.
Production Insight: A common mistake is to perform heavy logic within the
/pinghandler. This is an anti-pattern. The health check should be a lightweight, instantaneous check of the server's state (e.g., is the model object notNone?). Any delay risks a timeout and unnecessary instance cycling.
Container Lifecycle
Your serve script is the entrypoint that manages the container's lifecycle. A robust script follows a clear sequence.
#!/bin/bash
# A Production-Grade Serve Script

set -e # Exit immediately if a command exits with a non-zero status.

# 1. Environment Validation (Optional but Recommended)
echo "Validating environment..."
python --version
nvidia-smi || echo "GPU not available"

# 2. Change to Code Directory
# Ensures all relative paths in the application code are correct.
cd /opt/ml/code

# 3. Start the Inference Server
# 'exec' replaces the shell process with the Python process. This ensures
# that signals (like SIGTERM from SageMaker) are passed directly to the

# application, allowing for graceful shutdown.
echo "Starting inference server..."
exec python inference.py
By understanding these architectural layers and contracts, you can build containers that are not just functional but are true, reliable components of the SageMaker ecosystem, capable of scaling securely and efficiently.
Code Example: SageMaker Endpoint Inspector
#!/usr/bin/env python3
"""
SageMaker Endpoint Architecture Inspector
Analyze endpoint configuration and performance characteristics
"""

import boto3
import json
from datetime import datetime, timedelta

class SageMakerEndpointInspector:
    def __init__(self, endpoint_name, region='us-east-1'):
        self.endpoint_name = endpoint_name
        self.sagemaker = boto3.client('sagemaker', region_name=region)
        self.cloudwatch = boto3.client('cloudwatch', region_name=region)

    def analyze_endpoint_architecture(self):
        """Comprehensive endpoint architecture analysis"""

        # Get endpoint details
        endpoint = self.sagemaker.describe_endpoint(EndpointName=self.endpoint_name)

        # Get endpoint configuration
        config_name = endpoint['EndpointConfigName']
        config = self.sagemaker.describe_endpoint_config(EndpointConfigName=config_name)

        # Analyze production variants
        variant = config['ProductionVariants'][0]

        analysis = {
            'endpoint_status': endpoint['EndpointStatus'],
            'instance_type': variant['InstanceType'],
            'scaling_config': {
                'min_instances': variant.get('InitialInstanceCount', 1),
                'managed_scaling': variant.get('ManagedInstanceScaling', {}),
                'auto_scaling_enabled': 'ManagedInstanceScaling' in variant
            },
            'model_config': {
                'model_name': variant['ModelName'],
                'variant_weight': variant.get('InitialVariantWeight', 1.0)
            }
        }

        return analysis

    def get_performance_metrics(self, hours=24):
        """Retrieve performance metrics for analysis"""

        end_time = datetime.utcnow()
        start_time = end_time - timedelta(hours=hours)

        metrics = {}

        metric_queries = [
            ('Invocations', 'Sum'),
            ('ModelLatency', 'Average'),
            ('OverheadLatency', 'Average'),
            ('Invocation4XXErrors', 'Sum'),
            ('Invocation5XXErrors', 'Sum')
        ]

        for metric_name, statistic in metric_queries:
            response = self.cloudwatch.get_metric_statistics(
                Namespace='AWS/SageMaker',
                MetricName=metric_name,
                Dimensions=[
                    {
                        'Name': 'EndpointName',
                        'Value': self.endpoint_name
                    }
                ],
                StartTime=start_time,
                EndTime=end_time,
                Period=3600,  # 1 hour periods
                Statistics=[statistic]
            )

            datapoints = response['Datapoints']
            if datapoints:
                latest_value = max(datapoints, key=lambda x: x['Timestamp'])[statistic]
                metrics[metric_name.lower()] = latest_value
            else:
                metrics[metric_name.lower()] = 0

        return metrics

    def generate_report(self):
        """Generate comprehensive endpoint analysis report"""

        architecture = self.analyze_endpoint_architecture()
        performance = self.get_performance_metrics()

        report = {
            'endpoint_name': self.endpoint_name,
            'analysis_timestamp': datetime.utcnow().isoformat(),
            'architecture_analysis': architecture,
            'performance_metrics': performance,
            'recommendations': self.generate_recommendations(architecture, performance)
        }

        return report

    def generate_recommendations(self, architecture, performance):
        """Generate optimization recommendations"""

        recommendations = []

        # Check scaling configuration
        if not architecture['scaling_config']['auto_scaling_enabled']:
            recommendations.append({
                'type': 'scaling',
                'priority': 'high',
                'message': 'Enable ManagedInstanceScaling for serverless operation'
            })

        # Check error rates
        error_rate = (performance.get('invocation4xxerrors', 0) +
                     performance.get('invocation5xxerrors', 0))
        if error_rate > 0:
            recommendations.append({
                'type': 'reliability',
                'priority': 'medium',
                'message': f'Error rate detected: {error_rate} errors in last 24h'
            })

        # Check latency
        model_latency = performance.get('modellatency', 0)
        if model_latency > 30000:  # 30 seconds
            recommendations.append({
                'type': 'performance',
                'priority': 'medium',
                'message': f'High latency detected: {model_latency/1000:.1f}s average'
            })

        return recommendations

# Usage example
if __name__ == "__main__":
    inspector = SageMakerEndpointInspector('your-endpoint-name')
    report = inspector.generate_report()
    print(json.dumps(report, indent=2, default=str))


## Container Engineering for ML Models

## Beyond the Model: The Production Container

A trained model is only a mathematical artifact. A production container transforms it into a reliable, scalable, and efficient software component. This chapter details the engineering principles for building a production-grade container optimized for SageMaker's serverless environment, moving beyond simple `pip install` commands to create a truly robust asset.

## Dockerfile as Infrastructure

The Dockerfile is not just a script; it is a declaration of your model's runtime infrastructure. Every line has implications for build time, image size, and runtime performance.

### Base Image: The Foundation

The choice of a base image is the most critical decision in your Dockerfile. It determines the entire software stack, from the OS and system libraries to the CUDA drivers.

```dockerfile
# Production-optimized Dockerfile for OmegaFold
# We select a PyTorch-specific image from a reputable source (PyTorch team).
# This guarantees compatibility between the framework, CUDA, and cuDNN versions.
FROM pytorch/pytorch:2.0.1-cuda11.7-cudnn8-runtime

# Set environment variables for non-interactive setup and CUDA pathing.
# PYTHONUNBUFFERED=1 is critical for ensuring logs are sent to CloudWatch
# in real-time without being stuck in an output buffer.
ENV DEBIAN_FRONTEND=noninteractive
ENV PYTHONUNBUFFERED=1
Engineer's Note: A common failure mode is a mismatch between the CUDA version compiled into your ML framework (like PyTorch) and the version provided by the base image's driver. Using official framework images (e.g.,
pytorch/pytorch,tensorflow/tensorflow) mitigates this risk entirely. Avoid building up from a genericnvidia/cudaimage unless absolutely necessary for custom frameworks.
Dependency Management and Layer Caching
How you install dependencies directly impacts your development velocity. Docker builds images in layers, and an efficiently structured Dockerfile will cache unchanged layers, leading to dramatically faster rebuilds.
# Install system dependencies first, as they change infrequently.
RUN apt-get update && apt-get install -y git aria2 && rm -rf /var/lib/apt/lists/*

# Copy only the requirements file to leverage layer caching.
COPY requirements.txt /tmp/requirements.txt

# Install Python dependencies. If requirements.txt hasn't changed, Docker
# will use the cached layer from the previous build, skipping this slow step.
RUN pip install --no-cache-dir -r /tmp/requirements.txt && rm /tmp/requirements.txt

# --- Build Barrier ---
# Only copy your application code AFTER dependencies are installed.
# This ensures that frequent code changes don't invalidate the dependency layer cache.
COPY code/ /opt/ml/code/
This structure ensures that if you only change your application code in /code, the RUN pip install layer remains cached, reducing rebuild times from minutes to seconds.
Model Artifacts: To Bake or Not to Bake?
You can either "bake" model artifacts into the container image or have the container download them on startup.
- Baking In (Our Approach): Increases image size but guarantees availability and reduces startup time, as no network operations are needed. This is the preferred method for production reliability.
- Downloading on Startup: Keeps the image small but introduces a dependency on an external service (like S3) and adds a network-bound delay to the cold start sequence.
# We bake the model in for performance and reliability.
WORKDIR /opt/ml/model
RUN git clone --branch beta --depth 1 https://github.com/sokrypton/OmegaFold.git
WORKDIR /opt/ml/model/OmegaFold

# Download weights during the build process.
RUN aria2c -q -x 16 https://helixon.s3.amazonaws.com/release1.pt
The Inference Server: Robust and Responsive
The Python application inside the container must be engineered for a production environment.
The serve Script: A Reliable Entrypoint
The serve script is the first thing SageMaker executes. Its primary role is to start the inference server correctly.
#!/bin/bash
# /opt/ml/code/serve - A production-grade startup script

set -e # Exit immediately if any command fails.

# Environment validation is a good practice for debugging.
echo "Starting SageMaker container..."
python --version
nvidia-smi --query-gpu=name,memory.total --format=csv || echo "GPU not available"

# Change to the code directory to ensure correct pathing.
cd /opt/ml/code

# Use 'exec' to replace the shell process with the Python process.
# This is CRITICAL. It ensures that signals like SIGTERM from SageMaker
# are passed directly to the Python application, allowing for graceful shutdown.
# Without 'exec', the shell would swallow the signal, and your app would be
# killed abruptly.
echo "Starting inference server..."
exec python inference.py
Flask Server: The Application Core
We use Flask for its simplicity and robustness. The key is to separate the application logic from the model execution.
Inference via subprocess: A Critical Design Choice
You might be tempted to simply import main as omegafold and call its functions directly. We explicitly choose to use Python's subprocess module instead.
# From inference.py
def run_inference(self, sequence, num_cycles):
    # This command runs the OmegaFold script in its own isolated process.
    cmd = [
        'python', self.model_path,
        '--device', self.device,
        '--num_cycle', str(num_cycles),
        str(fasta_path),
        str(temp_dir)
    ]

    result = subprocess.run(
        cmd,
        capture_output=True, # Capture stdout and stderr
        text=True,           # Decode output as text
        timeout=600,         # Prevent runaway processes
        check=True           # Raise an exception on non-zero exit codes
    )
Architect's Note: The Subprocess Trade-off
- Robustness (Pro): Running inference in a subprocess provides process isolation. If the OmegaFold script has a memory leak or a CUDA error that crashes the process, it will not take down the main Flask server. The server can catch the exception, log the error, and return a clean HTTP
500response, remaining available for the next request. This is a massive win for production stability.- Overhead (Con): There is a small performance cost (tens of milliseconds) to starting a new Python process for each inference.
For production systems, the gain in robustness and error isolation far outweighs the minor performance overhead.
Health and Inference Endpoints
The implementation of the /ping and /invocations endpoints must be precise.
# Global model engine instance, initialized once on startup
model_engine = ModelInferenceEngine()

@app.route('/ping', methods=['GET'])
def ping():
    """A lightweight, instantaneous health check."""
    # This check should not perform any I/O or heavy computation.
    # It simply verifies that the server process is alive and the
    # model engine has successfully initialized.
    health = model_engine.is_initialized()
    status_code = 200 if health else 503 # 503 Service Unavailable
    return jsonify({"status": "Healthy" if health else "Initializing"}), status_code

@app.route('/invocations', methods=['POST'])
def invocations():
    """The main inference endpoint."""
    try:
        # 1. Validate input (fail fast)
        processed_input = model_engine.validate_input(request.get_json())

        # 2. Run inference (the heavy lifting)
        pdb_content = model_engine.run_inference(
            processed_input['sequence'],
            processed_input['num_cycles']
        )

        # 3. Format successful response
        return jsonify({'pdb_structure': pdb_content, 'status': 'success'}), 200

    except ValueError as e:
        # Handle bad client input specifically
        return jsonify({"error": str(e)}), 400

    except Exception as e:
        # Handle unexpected server-side failures
        logger.error(f"Inference failed: {traceback.format_exc()}")
        return jsonify({"error": "Inference failed"}), 500
This structure ensures that the container is a good citizen within the SageMaker ecosystem, providing clear signals about its health and handling both valid and invalid requests gracefully.
Code Example: Container Build Script
#!/bin/bash
# build-container.sh - Production container build script

set -e

# Configuration
IMAGE_NAME="omegafold-inference"
TAG="latest"
REGION="us-east-1"
ACCOUNT_ID=$(aws sts get-caller-identity --query Account --output text)
ECR_REPOSITORY="${ACCOUNT_ID}.dkr.ecr.${REGION}.amazonaws.com/${IMAGE_NAME}"

echo "Building container: ${IMAGE_NAME}:${TAG}"

# Build container
docker build -t ${IMAGE_NAME}:${TAG} -f Dockerfile.alternative .

# Test container locally
echo "Testing container locally..."
docker run -d --name test-container -p 8080:8080 ${IMAGE_NAME}:${TAG}

# Wait for startup
sleep 30

# Run tests
python test_container.py

# Clean up
docker stop test-container
docker rm test-container

# Push to ECR
echo "Pushing to ECR: ${ECR_REPOSITORY}"

# ECR login
aws ecr get-login-password --region ${REGION} | docker login --username AWS --password-stdin ${ECR_REPOSITORY}

# Tag and push
docker tag ${IMAGE_NAME}:${TAG} ${ECR_REPOSITORY}:${TAG}
docker push ${ECR_REPOSITORY}:${TAG}

echo "Container build and push completed successfully"
echo "Image URI: ${ECR_REPOSITORY}:${TAG}"
SageMaker Deployment Patterns
From Container to Production Service
With a production-ready container engineered, the next step is to deploy it as a scalable, reliable service. This chapter moves from containerization to orchestration, demonstrating how to define and launch your serverless ML endpoint using production-grade patterns that prioritize automation, repeatability, and safety.
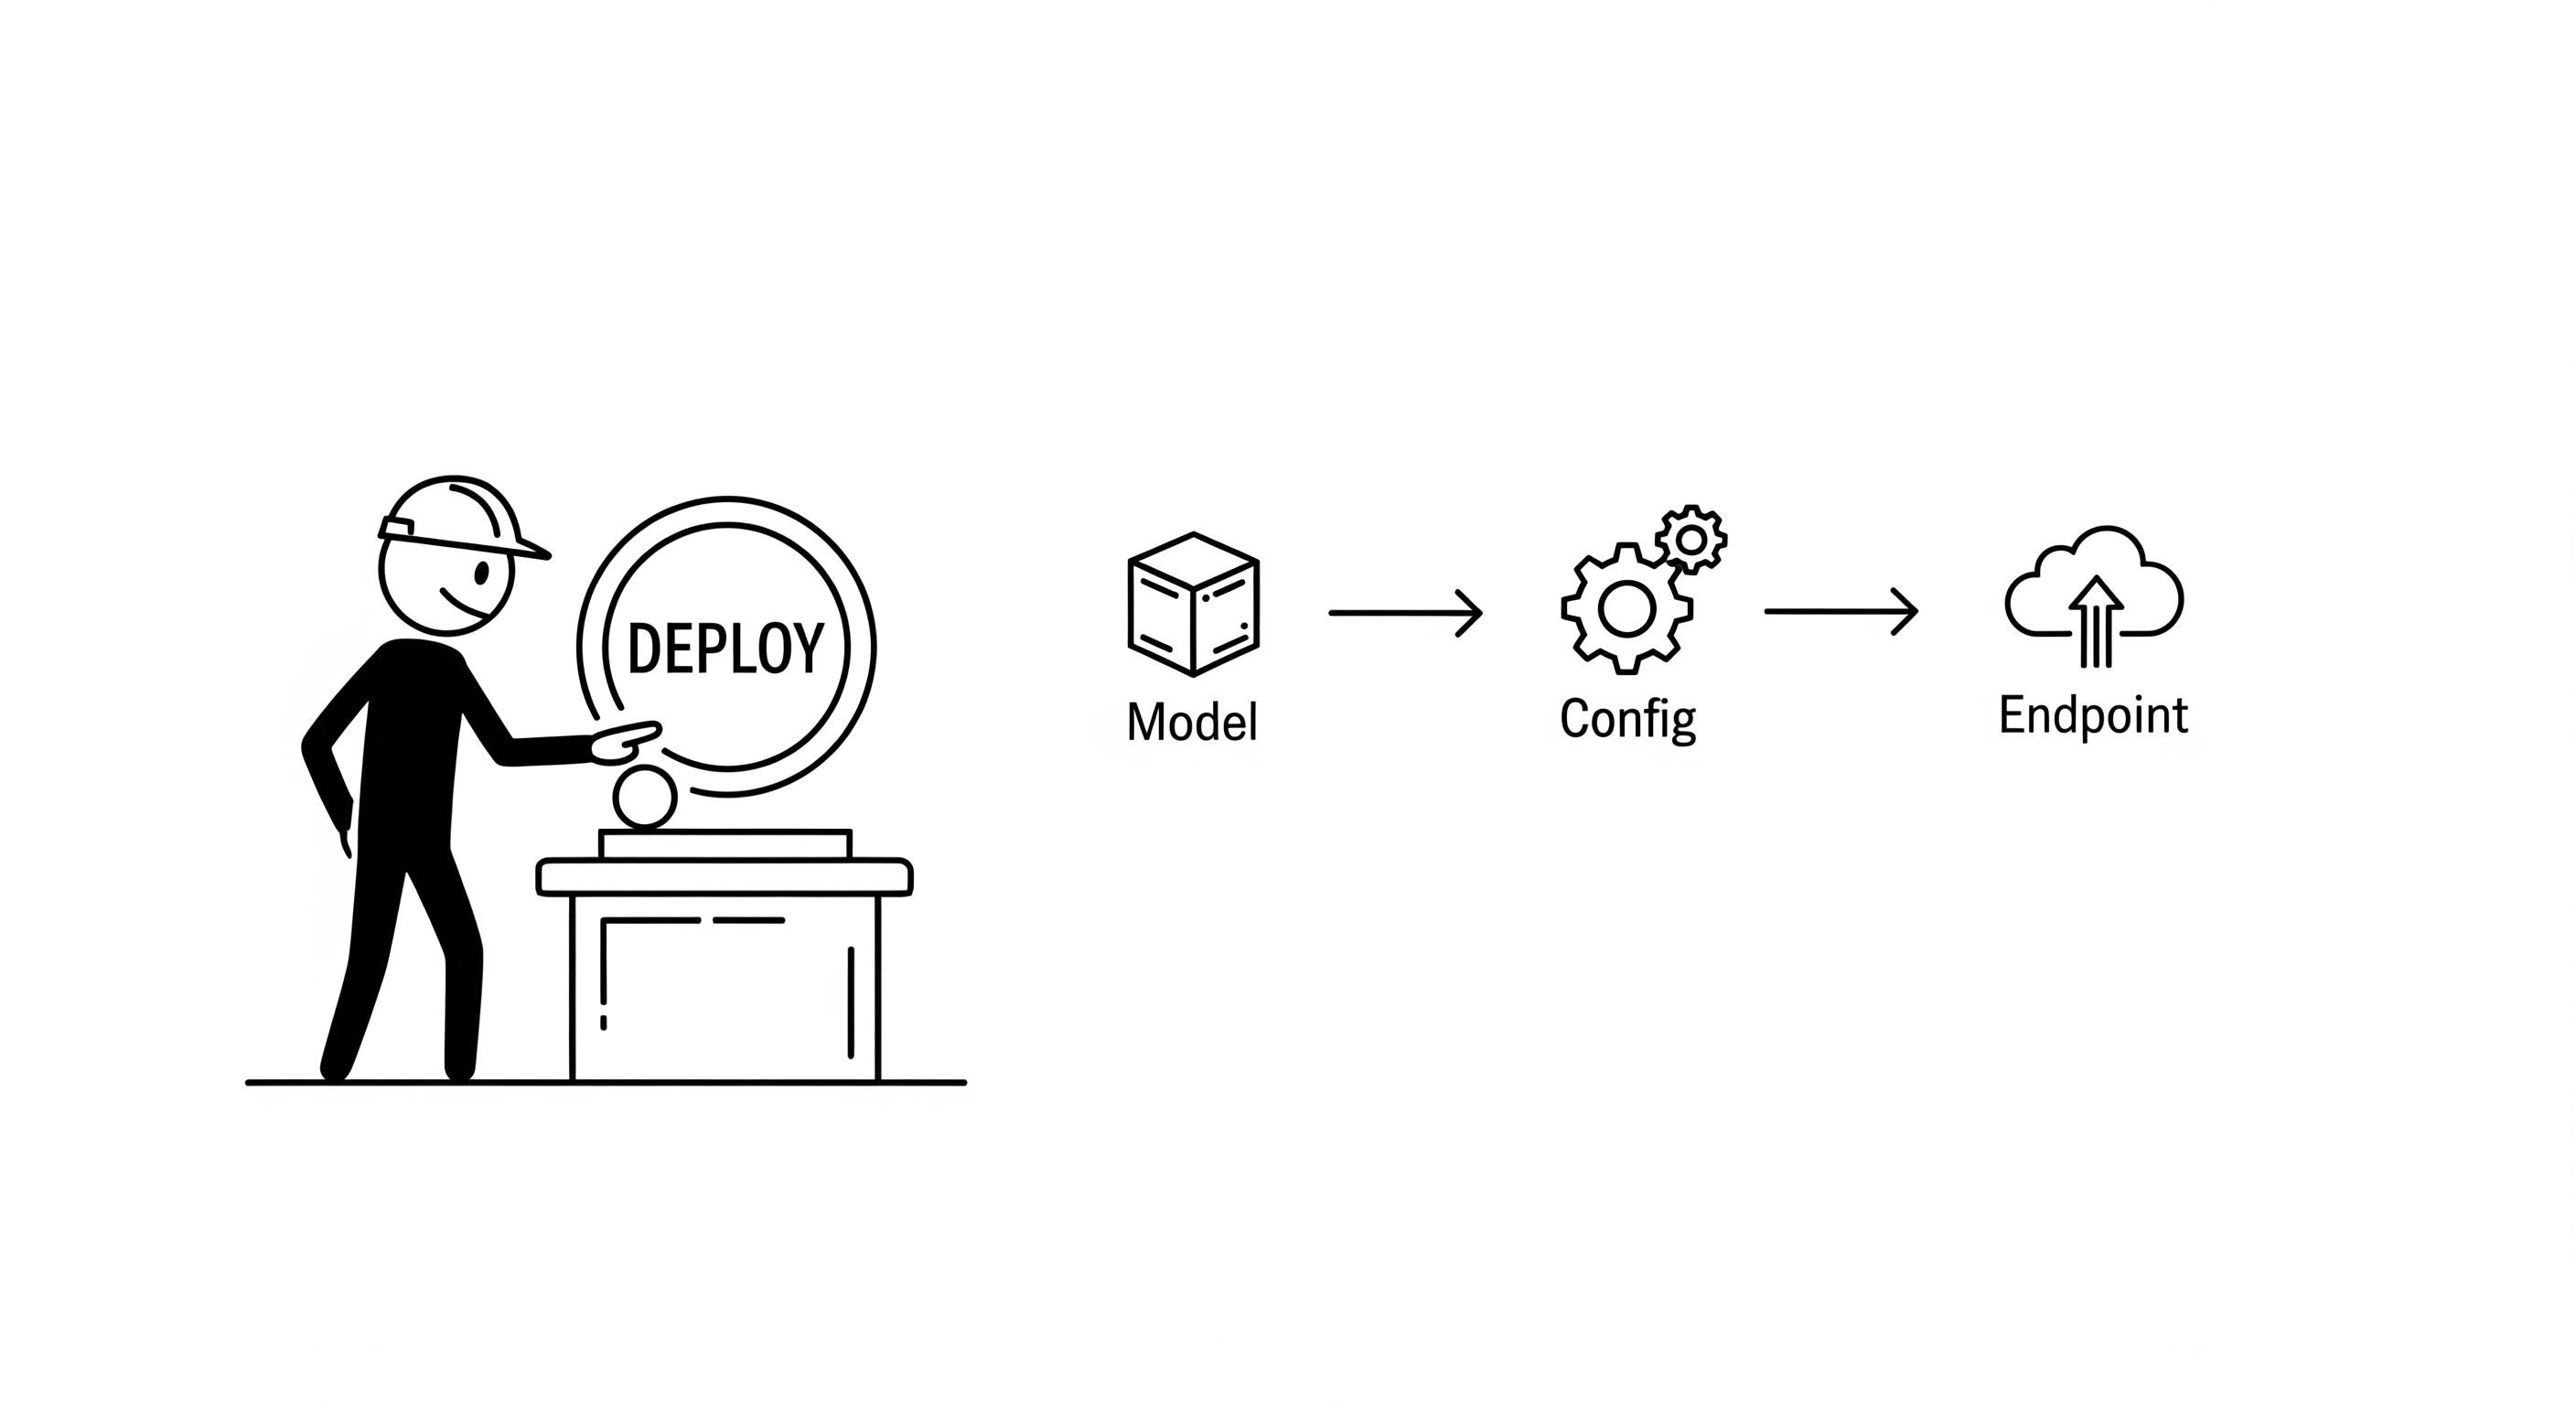
The SageMaker Deployment Abstraction
SageMaker's deployment process is built on a three-tiered abstraction. Understanding this hierarchy is key to managing your deployments effectively.
- Model: An object that logically links your container image (the what) with its required execution role (the permissions).
- Endpoint Configuration: A blueprint that defines the runtime infrastructure. It specifies the instance type (the hardware), the scaling strategy (the behavior), and which Model to deploy.
- Endpoint: The live, running service. It is the tangible realization of an Endpoint Configuration, providing an invocable HTTPS endpoint that routes traffic to your container.
This separation of concerns allows you to independently manage your container versions, infrastructure configurations, and live endpoints.
Production Deployment: An Automated Approach
For production systems, manual "point-and-click" deployment through the AWS console is not a viable option. It is not repeatable, not version-controlled, and prone to human error. We will instead implement a deployment manager script, an essential tool for any MLOps practice.
The Deployment Manager Class
Encapsulating deployment logic within a class provides structure, reusability, and state management.
"""
SageMaker Deployment Architecture
Model: Container image + execution environment
EndpointConfig: Instance specifications + scaling policies
Endpoint: Running inference service
"""

deployment_architecture = {
    'model': {
        'container_image': 'ECR_URI',
        'execution_role': 'SageMakerExecutionRole',
        'environment_variables': {}
    },
    'endpoint_config': {
        'instance_type': 'ml.g4dn.xlarge',
        'initial_instance_count': 0,  # Serverless
        'scaling_policy': 'ManagedInstanceScaling'
    },
    'endpoint': {
        'name': 'serverless-ml-endpoint',
        'config_name': 'endpoint-config',
        'status': 'InService'
    }
}
The Deployment Sequence in Code
The following script implements the three-tier abstraction using the AWS SDK.
#!/usr/bin/env python3
"""
Production SageMaker Deployment Script
Implements serverless ML endpoint with scale-to-zero capability
"""

import boto3
import json
import time
from datetime import datetime
from typing import Dict, Optional

class SageMakerDeploymentManager:
    """Production deployment manager for SageMaker endpoints"""

    def __init__(self, region='us-east-1'):
        self.region = region
        self.sagemaker = boto3.client('sagemaker', region_name=region)
        self.autoscaling = boto3.client('application-autoscaling', region_name=region)
        self.timestamp = datetime.now().strftime("%Y%m%d-%H%M%S")

    def deploy_serverless_endpoint(self,
                                  container_image: str,
                                  model_name: str,
                                  execution_role: str,
                                  instance_type: str = 'ml.g4dn.xlarge') -> Dict:
        """Deploy complete serverless ML endpoint"""

        deployment_config = {
            'model_name': f"{model_name}-{self.timestamp}",
            'config_name': f"{model_name}-config-{self.timestamp}",
            'endpoint_name': f"{model_name}-endpoint-{self.timestamp}",
            'container_image': container_image,
            'execution_role': execution_role,
            'instance_type': instance_type
        }

        try:
            # Step 1: Create SageMaker model
            model_response = self.create_model(deployment_config)
            print(f"✅ Model created: {deployment_config['model_name']}")

            # Step 2: Create endpoint configuration
            config_response = self.create_endpoint_config(deployment_config)
            print(f"✅ Endpoint config created: {deployment_config['config_name']}")

            # Step 3: Deploy endpoint
            endpoint_response = self.create_endpoint(deployment_config)
            print(f"✅ Endpoint deployment initiated: {deployment_config['endpoint_name']}")

            # Step 4: Wait for endpoint to be in service
            self.wait_for_endpoint(deployment_config['endpoint_name'])
            print(f"✅ Endpoint is in service: {deployment_config['endpoint_name']}")

            # Step 5: Configure auto-scaling
            scaling_response = self.configure_auto_scaling(deployment_config)
            print(f"✅ Auto-scaling configured")

            return {
                'status': 'success',
                'endpoint_name': deployment_config['endpoint_name'],
                'model_name': deployment_config['model_name'],
                'config_name': deployment_config['config_name'],
                'deployment_time': time.time()
            }

        except Exception as e:
            print(f"❌ Deployment failed: {str(e)}")
            # Cleanup on failure
            self.cleanup_failed_deployment(deployment_config)
            raise

    def create_model(self, config: Dict) -> Dict:
        """Create SageMaker model with container specification"""

        model_spec = {
            'ModelName': config['model_name'],
            'PrimaryContainer': {
                'Image': config['container_image'],
                'Mode': 'SingleModel',
                'Environment': {
                    'SAGEMAKER_PROGRAM': 'inference.py',
                    'SAGEMAKER_SUBMIT_DIRECTORY': '/opt/ml/code'
                }
            },
            'ExecutionRoleArn': config['execution_role'],
            'Tags': [
                {
                    'Key': 'Project',
                    'Value': 'ServerlessML'
                },
                {
                    'Key': 'Environment',
                    'Value': 'Production'
                }
            ]
        }

        return self.sagemaker.create_model(**model_spec)

    def create_endpoint_config(self, config: Dict) -> Dict:
        """Create endpoint configuration with serverless scaling"""

        config_spec = {
            'EndpointConfigName': config['config_name'],
            'ProductionVariants': [
                {
                    'VariantName': 'primary',
                    'ModelName': config['model_name'],
                    'InitialInstanceCount': 0,  # Scale-to-zero
                    'InstanceType': config['instance_type'],
                    'InitialVariantWeight': 1.0,
                    'ManagedInstanceScaling': {
                        'Status': 'ENABLED',
                        'MinInstanceCount': 0,
                        'MaxInstanceCount': 5
                    }
                }
            ],
            'Tags': [
                {
                    'Key': 'ServerlessEnabled',
                    'Value': 'true'
                }
            ]
        }

        return self.sagemaker.create_endpoint_config(**config_spec)

    def create_endpoint(self, config: Dict) -> Dict:
        """Create SageMaker endpoint"""

        endpoint_spec = {
            'EndpointName': config['endpoint_name'],
            'EndpointConfigName': config['config_name'],
            'Tags': [
                {
                    'Key': 'DeploymentTimestamp',
                    'Value': self.timestamp
                }
            ]
        }

        return self.sagemaker.create_endpoint(**endpoint_spec)

    def configure_auto_scaling(self, config: Dict) -> Dict:
        """Configure Application Auto Scaling for serverless operation"""

        resource_id = f"endpoint/{config['endpoint_name']}/variant/primary"

        # Register scalable target
        register_response = self.autoscaling.register_scalable_target(
            ServiceNamespace='sagemaker',
            ResourceId=resource_id,
            ScalableDimension='sagemaker:variant:DesiredInstanceCount',
            MinCapacity=0,
            MaxCapacity=5
        )

        # Create target tracking scaling policy
        policy_response = self.autoscaling.put_scaling_policy(
            PolicyName=f"{config['endpoint_name']}-scaling-policy",
            ServiceNamespace='sagemaker',
            ResourceId=resource_id,
            ScalableDimension='sagemaker:variant:DesiredInstanceCount',
            PolicyType='TargetTrackingScaling',
            TargetTrackingScalingPolicyConfiguration={
                'TargetValue': 70.0,
                'PredefinedMetricSpecification': {
                    'PredefinedMetricType': 'SageMakerVariantInvocationsPerInstance'
                },
                'ScaleOutCooldown': 300,  # 5 minutes
                'ScaleInCooldown': 900    # 15 minutes
            }
        )

        return {
            'register_response': register_response,
            'policy_response': policy_response
        }

    def wait_for_endpoint(self, endpoint_name: str, timeout_minutes: int = 20) -> None:
        """Wait for endpoint to reach InService status"""

        print(f"⏳ Waiting for endpoint {endpoint_name} to be in service...")

        start_time = time.time()
        timeout_seconds = timeout_minutes * 60

        while True:
            try:
                response = self.sagemaker.describe_endpoint(EndpointName=endpoint_name)
                status = response['EndpointStatus']

                if status == 'InService':
                    break
                elif status == 'Failed':
                    failure_reason = response.get('FailureReason', 'Unknown error')
                    raise RuntimeError(f"Endpoint deployment failed: {failure_reason}")
                elif time.time() - start_time > timeout_seconds:
                    raise TimeoutError(f"Endpoint deployment timed out after {timeout_minutes} minutes")

                print(f"   Status: {status}, waiting...")
                time.sleep(30)

            except Exception as e:
                if "does not exist" in str(e):
                    print("   Endpoint not yet created, continuing to wait...")
                    time.sleep(10)
                else:
                    raise

    def cleanup_failed_deployment(self, config: Dict) -> None:
        """Clean up resources from failed deployment"""

        print("🧹 Cleaning up failed deployment...")

        # Delete endpoint if it exists
        try:
            self.sagemaker.delete_endpoint(EndpointName=config['endpoint_name'])
            print(f"   Deleted endpoint: {config['endpoint_name']}")
        except:
            pass

        # Delete endpoint config if it exists
        try:
            self.sagemaker.delete_endpoint_config(EndpointConfigName=config['config_name'])
            print(f"   Deleted endpoint config: {config['config_name']}")
        except:
            pass

        # Delete model if it exists
        try:
            self.sagemaker.delete_model(ModelName=config['model_name'])
            print(f"   Deleted model: {config['model_name']}")
        except:
            pass

def main():
    """Main deployment execution"""

    # Configuration - update these values for your deployment
    CONTAINER_IMAGE = "123456789012.dkr.ecr.us-east-1.amazonaws.com/omegafold:latest"
    MODEL_NAME = "omegafold-serverless"
    EXECUTION_ROLE = "arn:aws:iam::123456789012:role/SageMakerExecutionRole"
    INSTANCE_TYPE = "ml.g4dn.xlarge"

    # Initialize deployment manager
    deployer = SageMakerDeploymentManager(region='us-east-1')

    try:
        # Deploy serverless endpoint
        result = deployer.deploy_serverless_endpoint(
            container_image=CONTAINER_IMAGE,
            model_name=MODEL_NAME,
            execution_role=EXECUTION_ROLE,
            instance_type=INSTANCE_TYPE
        )

        print("\n🎉 Deployment completed successfully!")
        print(f"📋 Endpoint name: {result['endpoint_name']}")
        print(f"⚡ Ready for serverless inference!")

        return result

    except Exception as e:
        print(f"\n💥 Deployment failed: {str(e)}")
        raise

if __name__ == "__main__":
    main()
Infrastructure as Code (IaC): The Source of Truth
While a deployment script is excellent for imperative execution, a declarative IaC template (like CloudFormation) should serve as the ultimate source of truth for your infrastructure's desired state. It enables version control, peer review, and automated auditing of your infrastructure.
CloudFormation Template for Serverless Endpoints
This template defines all the necessary resources for our serverless endpoint. It can be deployed via the AWS CLI or integrated into a CI/CD pipeline.
# sagemaker-serverless-template.yaml
AWSTemplateFormatVersion: '2010-09-09'
Description: 'Serverless ML deployment on SageMaker'

Parameters:
  ModelName:
    Type: String
    Default: 'omegafold-serverless'
    Description: 'Name for the ML model'

  ContainerImage:
    Type: String
    Description: 'ECR URI for the container image'

  InstanceType:
    Type: String
    Default: 'ml.g4dn.xlarge'
    AllowedValues:
      - 'ml.g4dn.xlarge'
      - 'ml.g4dn.2xlarge'
      - 'ml.p3.2xlarge'
    Description: 'Instance type for inference'

Resources:
  SageMakerExecutionRole:
    Type: 'AWS::IAM::Role'
    Properties:
      AssumeRolePolicyDocument:
        Version: '2012-10-17'
        Statement:
          - Effect: Allow
            Principal:
              Service: sagemaker.amazonaws.com
            Action: 'sts:AssumeRole'
      ManagedPolicyArns:
        - 'arn:aws:iam::aws:policy/AmazonSageMakerFullAccess'
      Policies:
        - PolicyName: 'ECRAccess'
          PolicyDocument:
            Version: '2012-10-17'
            Statement:
              - Effect: Allow
                Action:
                  - 'ecr:GetAuthorizationToken'
                  - 'ecr:BatchCheckLayerAvailability'
                  - 'ecr:GetDownloadUrlForLayer'
                  - 'ecr:BatchGetImage'
                Resource: '*'

  SageMakerModel:
    Type: 'AWS::SageMaker::Model'
    Properties:
      ModelName: !Sub '${ModelName}-${AWS::StackId}'
      ExecutionRoleArn: !GetAtt SageMakerExecutionRole.Arn
      PrimaryContainer:
        Image: !Ref ContainerImage
        Mode: 'SingleModel'
        Environment:
          SAGEMAKER_PROGRAM: 'inference.py'

  SageMakerEndpointConfig:
    Type: 'AWS::SageMaker::EndpointConfig'
    Properties:
      EndpointConfigName: !Sub '${ModelName}-config-${AWS::StackId}'
      ProductionVariants:
        - VariantName: 'primary'
          ModelName: !Ref SageMakerModel
          InitialInstanceCount: 0
          InstanceType: !Ref InstanceType
          InitialVariantWeight: 1.0
          ManagedInstanceScaling:
            Status: 'ENABLED'
            MinInstanceCount: 0
            MaxInstanceCount: 5

  SageMakerEndpoint:
    Type: 'AWS::SageMaker::Endpoint'
    Properties:
      EndpointName: !Sub '${ModelName}-endpoint-${AWS::StackId}'
      EndpointConfigName: !Ref SageMakerEndpointConfig

Outputs:
  EndpointName:
    Description: 'SageMaker endpoint name'
    Value: !Ref SageMakerEndpoint
    Export:
      Name: !Sub '${AWS::StackName}-EndpointName'

  ModelName:
    Description: 'SageMaker model name'
    Value: !Ref SageMakerModel

  ExecutionRole:
    Description: 'SageMaker execution role ARN'
    Value: !GetAtt SageMakerExecutionRole.Arn
Production Insight: The choice between a deployment script and an IaC template is not "either/or". They serve different purposes. IaC defines the state, while a script executes the process. A robust CI/CD pipeline often uses both: it calls a script that deploys a CloudFormation stack and then runs a validation suite against the resulting endpoint.
Deployment Validation: The Final Gate
A deployment is only successful if the resulting service is healthy and performs as expected. Automated, post-deployment validation is a non-negotiable step in a production pipeline.
A Comprehensive Validation Suite
The EndpointValidator class should test multiple facets of the live endpoint.
# The EndpointValidator class from previous examples serves this purpose.
class EndpointValidator:
    def run_comprehensive_validation(self):
        """A sequence of tests to certify a new endpoint."""

        # 1. Configuration Check: Is the endpoint deployed as specified?
        # Verifies instance type, scaling config, etc.
        self.validate_endpoint_status()

        # 2. Cold Start Test: Does it scale from zero correctly?
        # This is the most critical test for a serverless endpoint. It
        # measures the worst-case latency a user might experience.
        self.test_cold_start_performance()

        # 3. Warm Performance Test: Does it meet latency SLAs under load?
        # Measures the typical response time after the instance is running.
        self.test_warm_instance_performance()

        # 4. Error Handling Test: Does it fail gracefully?
        # Sends an invalid payload to ensure a 400 error is returned, not a 500.
        self.test_bad_input_handling()
By integrating these automated deployment and validation patterns, you create a reliable, repeatable MLOps workflow that significantly reduces the risk of production failures and provides a solid foundation for scaling your ML services.
Scale-to-Zero Implementation Deep Dive
With the deployment patterns established, this chapter focuses on the single most critical component for achieving our serverless goal: the ManagedInstanceScaling configuration. Mastering this feature is the key to unlocking the 99%+ cost savings that make this architecture so powerful.
The ManagedInstanceScaling Contract
When you enable ManagedInstanceScaling within an Endpoint Configuration, you are delegating direct control of instance provisioning to the SageMaker Data Plane. This is a deliberate trade-off: you exchange granular control over scaling metrics for a fully managed, purpose-built scaling engine optimized for ML workloads.
The entire serverless behavior is enabled by this specific block within the ProductionVariants section of your endpoint configuration.
Source: Cell 5 of notebook_deployment_complete.ipynb
# From the Endpoint Configuration step
'ProductionVariants': [{
    'VariantName': 'primary',
    'ModelName': MODEL_NAME,
    'InstanceType': 'ml.g4dn.xlarge',
    # We set InitialInstanceCount to 1 to ensure the endpoint starts healthy.
    # The auto-scaler will then scale it down to 0 after the cooldown period.
    'InitialInstanceCount': 1,
    'InitialVariantWeight': 1.0,
    # This block is the core of the serverless configuration.
    'ManagedInstanceScaling': {
        'Status': 'ENABLED',
        'MinInstanceCount': 0,  # The "floor" - allows scaling to zero.
        'MaxInstanceCount': 3,  # The "ceiling" - prevents runaway costs.
    }
}]
Deconstructing the Key Parameters
MinInstanceCount: 0: This is the explicit instruction that enables scale-to-zero. Without this, the lowest the scaler would go is 1, reverting to the inefficient "always-on" model.MaxInstanceCount: 3: This is a crucial cost-control and performance-capping measure. It sets the upper bound on how many instances can be provisioned, preventing a sudden traffic spike from causing an unexpectedly large bill.InitialInstanceCount: 1: While it seems counter-intuitive for a scale-to-zero endpoint, provisioning one instance initially is a production best practice. It ensures the endpoint deployment completes successfully and is immediately "warm" and ready for validation tests. TheManagedInstanceScalingservice will automatically scale this down to zero after the idle period.
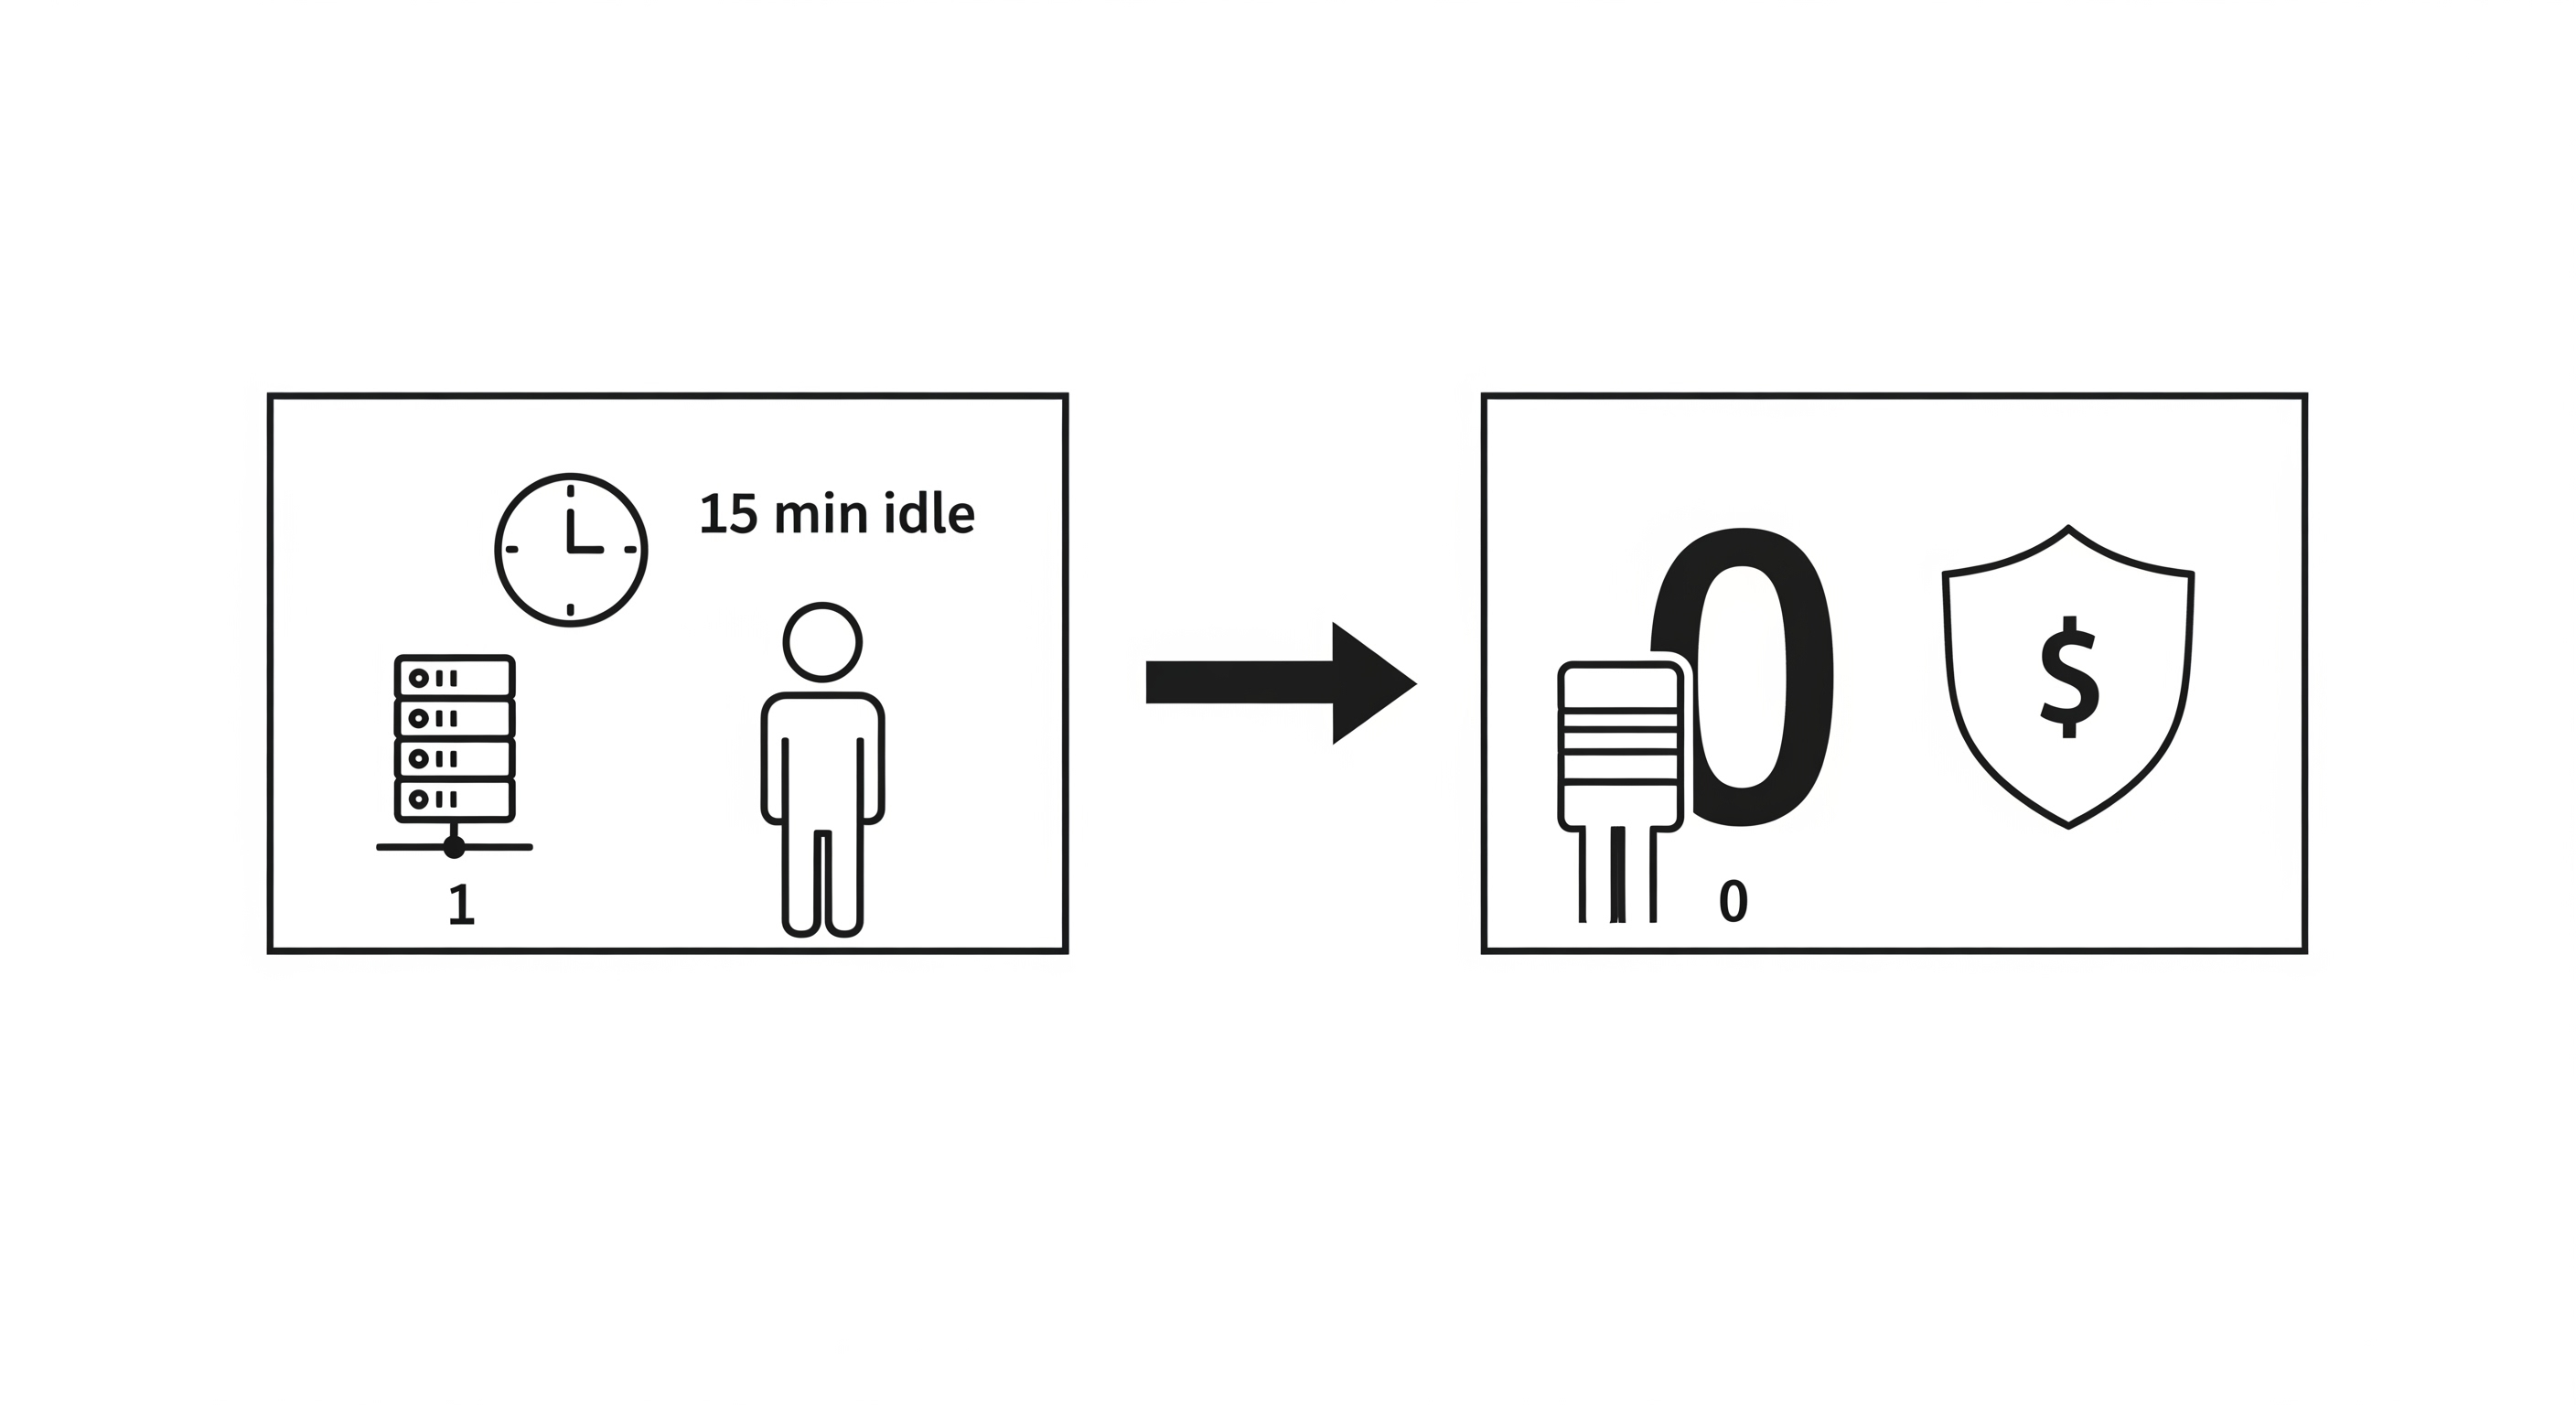
The Cooldown Period: A Deliberate Trade-off
The SageMaker ManagedInstanceScaling engine uses a default scale-in cooldown period of 15 minutes. This is a non-negotiable, platform-level setting.
Definition: The scale-in cooldown is the duration of zero-request inactivity that must pass before the last active instance is terminated.
Architect's Note: Why a 15-Minute Cooldown?
A 15-minute cooldown might seem long, but it's a deliberate engineering choice designed to optimize for common traffic patterns. It prevents a phenomenon known as "thrashing," where an endpoint might scale down to zero, only to receive another request moments later, forcing it to pay the full cold-start penalty again.
- Cost: This buffer means you pay for 15 minutes of idle time on the last instance before it shuts down (approx. $1.20 * 0.25 = $0.30).
- Benefit: If another request arrives within that 15-minute window, the user receives a "warm" response (~15-20 seconds) instead of a "cold" one (~60 seconds).
For applications with bursty or session-based traffic, this trade-off is highly advantageous, significantly improving the average user-perceived latency at a minimal cost.
The Myth of the Separate Auto Scaling Policy
A common point of confusion is the relationship between ManagedInstanceScaling and the more general Application Auto Scaling service in AWS. For our serverless use case, the distinction is simple.
When you enable ManagedInstanceScaling in your Endpoint Configuration, SageMaker automatically creates and manages the necessary Application Auto Scaling resources for you.
You do not need to manually create a separate put_scaling_policy call.
The logic within the SageMaker Data Plane is already configured to monitor the InvocationsPerInstance metric and scale the DesiredInstanceCount of your endpoint's variant between the MinInstanceCount and MaxInstanceCount you defined. Manually adding another policy can lead to conflicting scaling actions and unpredictable behavior.
Production Insight: The beauty of
ManagedInstanceScalinglies in its simplicity. By defining the floor (MinInstanceCount: 0) and the ceiling (MaxInstanceCount), you provide the scaler with the only two bounds it needs. It handles the rest, abstracting away the complexity of target values, metric selection, and policy creation that you would otherwise need to manage yourself. Trust the managed service.
Verifying Serverless Behavior
You can verify the scale-to-zero configuration in the AWS Console.
- Navigate to SageMaker -> Inference -> Endpoints.
- Select your deployed endpoint.
- Scroll down to the Endpoint runtime settings section.
You will see your variant (primary) listed. After the 15-minute cooldown period with no traffic, the "Instance count" will change from 1 to 0.
Monitoring the Scaling Activity:
- Navigate to CloudWatch -> Metrics -> All metrics.
- Select SageMaker -> Endpoint Metrics.
- Filter by your
EndpointName. - Graph the
InstanceCountmetric.
You will observe the following pattern:
- Deployment:
InstanceCountis1. - After 15 minutes of inactivity:
InstanceCountdrops to0. - On first new request:
InstanceCountjumps back to1(the cold start). - Under load:
InstanceCountmay increase to2or3if requests overwhelm the capacity of the current instances.
This observable behavior is the definitive proof that your serverless architecture is functioning exactly as designed.
Universal Client Access Patterns
A deployed endpoint is only useful if client applications can interact with it reliably and securely. This chapter provides a comprehensive guide to invoking your SageMaker endpoint from various environments, establishing a robust bridge between your production ML service and its consumers.
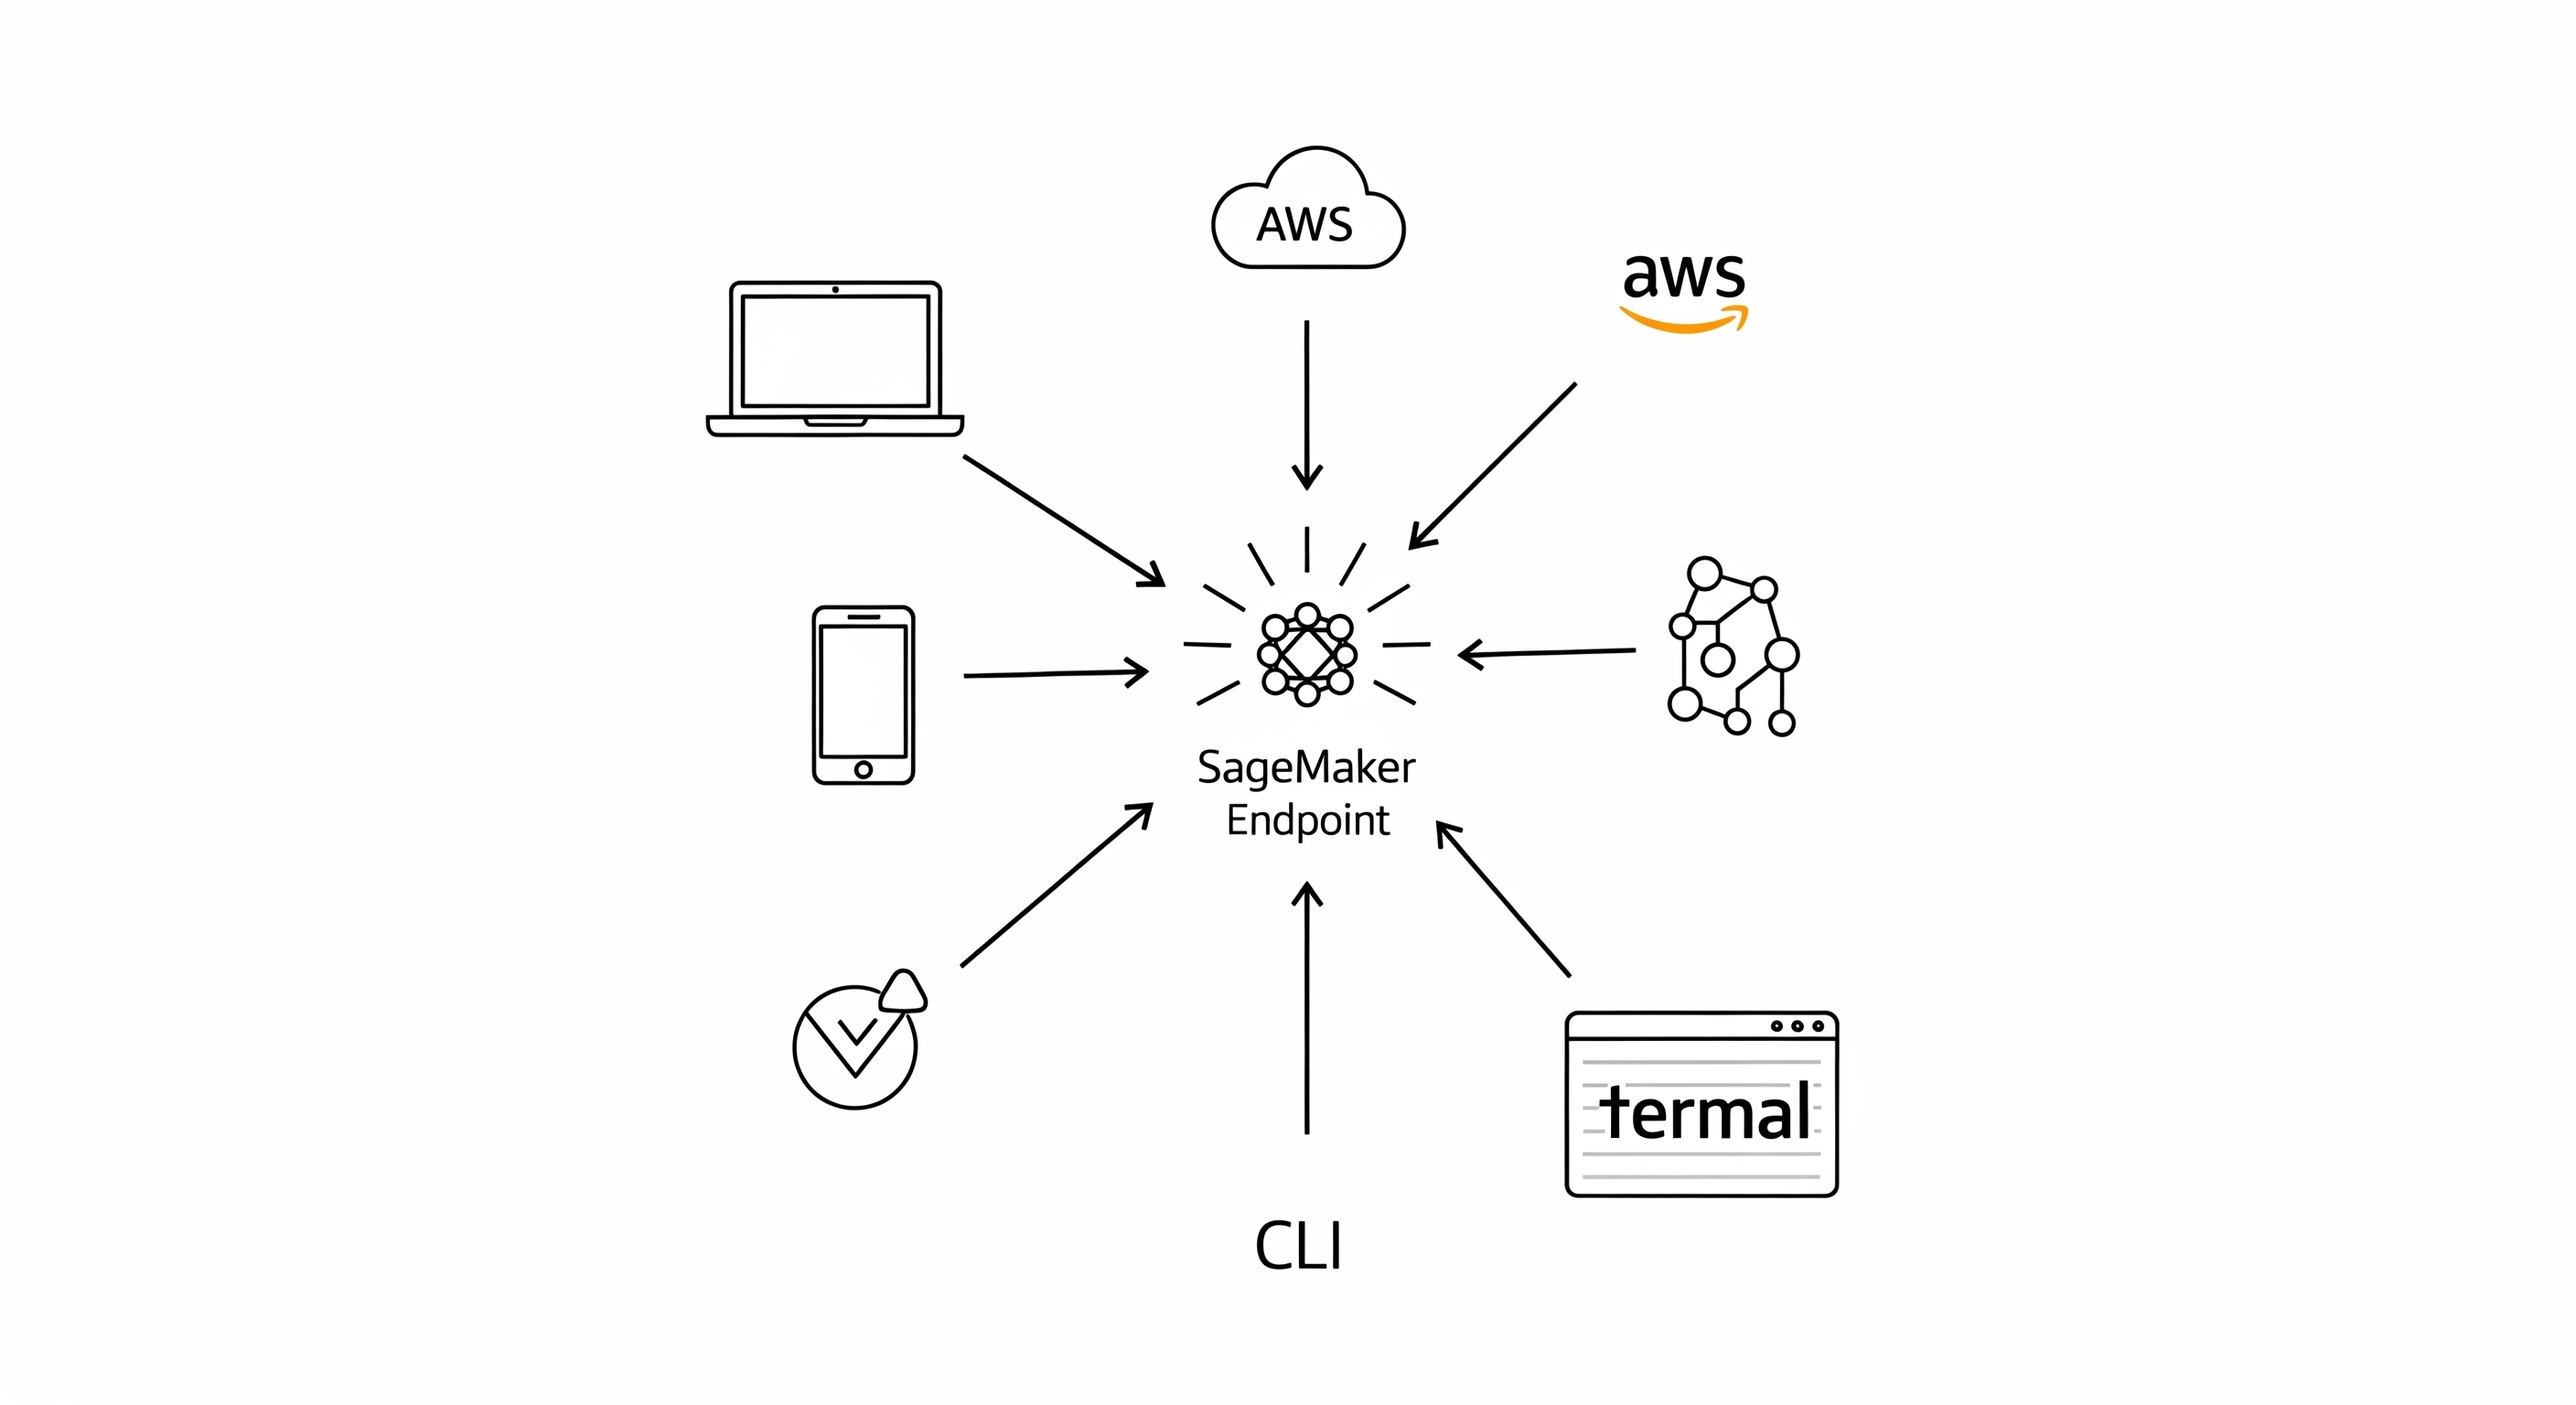
The SageMaker Runtime: Your Gateway to Inference
Interaction with a live SageMaker endpoint is not done via a standard public URL. Instead, all requests are brokered through the SageMaker Runtime service. This is a critical security and management feature.
Architectural Flow:
Client Application -> AWS SDK (calls SageMaker Runtime) -> SageMaker Data Plane -> Your Endpoint
This architecture provides several key advantages:
- IAM-Based Security: Every single invocation is authenticated and authorized via AWS IAM. There is no such thing as an "unauthenticated" request.
- Standardized Interface: All endpoints, regardless of their underlying model or container, are invoked using the same
invoke_endpointAPI call. - Auditing and Throttling: All requests are logged in CloudTrail, and the runtime provides a central point for applying throttling rules and usage quotas.
Production Client Implementation
For any application that will regularly invoke the endpoint, it is a best practice to encapsulate the invocation logic within a dedicated client class. This promotes code reuse, simplifies error handling, and centralizes configuration.
The quick_start_universal_client.py script from our repository provides a production-ready example of such a client.
Source: quick_start_universal_client.py
#!/usr/bin/env python3
import boto3
import json
import time
from datetime import datetime

class UniversalOmegaFoldClient:
    """Production-ready client for the SageMaker OmegaFold endpoint."""

    def __init__(self, endpoint_name: str, region: str = 'us-east-2'):
        self.endpoint_name = endpoint_name
        self.region = region

        print(f"🔧 Initializing client for endpoint: {endpoint_name} in region {region}")

        try:
            # Initialize the SageMaker Runtime client, which is the
            # specific service responsible for endpoint invocations.
            self.runtime = boto3.client('sagemaker-runtime', region_name=region)

            # It's good practice to verify credentials on initialization.
            sts = boto3.client('sts', region_name=region)
            identity = sts.get_caller_identity()
            print(f"✅ AWS credentials valid (Account: {identity['Account']})")

        except Exception as e:
            print(f"❌ Failed to initialize AWS client. Ensure credentials are configured.")
            print("💡 Run 'aws configure' or ensure IAM role has permissions.")
            raise

    def predict_structure(self, sequence: str, num_cycles: int = 4) -> dict:
        """
        Invokes the endpoint to predict a protein structure.

        Args:
            sequence: The protein amino acid sequence.
            num_cycles: Number of refinement cycles for the model.

        Returns:
            A dictionary containing the prediction result from the endpoint.
        """
        print(f"\n🧬 Predicting structure for a sequence of length {len(sequence)}...")

        payload = {
            "sequence": sequence,
            "num_cycles": num_cycles
        }

        start_time = time.time()

        try:
            # This is the core API call to the SageMaker Runtime.
            response = self.runtime.invoke_endpoint(
                EndpointName=self.endpoint_name,
                ContentType='application/json',  # Must match what your container expects.
                Body=json.dumps(payload)
            )

            end_time = time.time()
            response_time = round(end_time - start_time, 2)

            # The response body is a streaming object that must be read and decoded.
            result_body = response['Body'].read().decode('utf-8')
            result = json.loads(result_body)

            print(f"✅ Prediction successful in {response_time} seconds.")
            return result

        except Exception as e:
            print(f"❌ Prediction failed: {str(e)}")
            # For production systems, you would add more specific error handling here
            # to distinguish between client errors (4xx) and server errors (5xx).
            raise

# --- Example Usage ---
if __name__ == "__main__":
    # IMPORTANT: Replace with your actual deployed endpoint name.
    ENDPOINT_NAME = "omegafold-scale-to-zero-20250623-154152"
    AWS_REGION = "us-east-2"

    # Instantiate the client
    client = UniversalOmegaFoldClient(endpoint_name=ENDPOINT_NAME, region=AWS_REGION)

    # Define a test sequence
    test_sequence = "MKQHKAMIVALIVICITAVVAALVTRKDLCEVHIRTGQTEVAVF"

    # Get the prediction
    prediction_result = client.predict_structure(test_sequence, num_cycles=2)

    # Save the resulting PDB structure to a file
    pdb_structure = prediction_result.get('pdb_structure', '')
    if pdb_structure:
        with open("predicted_structure.pdb", "w") as f:
            f.write(pdb_structure)
        print("💾 PDB structure saved to predicted_structure.pdb")
Authentication Patterns for Different Environments
How your client authenticates with the SageMaker Runtime depends on the environment from which it is run.
1. Local Development Machine
This is the most common scenario for testing and ad-hoc analysis. The AWS SDKs are designed to automatically find credentials in a specific order.
Setup:
- Install the AWS CLI:
pip install awscli - Configure credentials:
aws configure- You will be prompted for an
AWS Access Key IDandAWS Secret Access Key. These should belong to an IAM user withSageMakerFullAccessor a more restrictive, custom policy that includessagemaker:InvokeEndpoint.
- You will be prompted for an
Your Python script, with no changes, will automatically use these credentials.
2. AWS EC2 Instance or ECS Container
For applications running within your AWS environment, using static access keys is an anti-pattern. The correct approach is to use IAM Roles.
Setup:
- Create an IAM Role (e.g.,
MyWebAppRole). - Attach a policy to this role that grants
sagemaker:InvokeEndpointpermission on the specific endpoint ARN.{ "Version": "2012-10-17", "Statement": [ { "Effect": "Allow", "Action": "sagemaker:InvokeEndpoint", "Resource": "arn:aws:sagemaker:us-east-2:123456789012:endpoint/omegafold-scale-to-zero-*" } ] } - Launch your EC2 instance or ECS task with this IAM Role attached.
The AWS SDK running on the instance will automatically assume the role and acquire temporary credentials. No code changes are needed.
3. CI/CD Pipelines (e.g., GitHub Actions)
For automated pipelines, credentials should be stored as secrets.
Setup:
- In your repository, go to
Settings -> Secrets and variables -> Actions. - Create two secrets:
AWS_ACCESS_KEY_IDandAWS_SECRET_ACCESS_KEY. - In your GitHub Actions workflow file, expose these secrets as environment variables.
Workflow YAML Snippet:
jobs:
  test-endpoint:
    runs-on: ubuntu-latest
    steps:
      - name: Checkout code
        uses: actions/checkout@v3

      - name: Configure AWS Credentials
        uses: aws-actions/configure-aws-credentials@v2
        with:
          aws-access-key-id: ${{ secrets.AWS_ACCESS_KEY_ID }}
          aws-secret-access-key: ${{ secrets.AWS_SECRET_ACCESS_KEY }}
          aws-region: us-east-2

      - name: Run Integration Test
        run: python ./path/to/your/client_test_script.py
Command Line Invocation
For quick tests or integration with shell scripts, the AWS CLI provides a direct way to invoke the endpoint.
Source: quick_start_universal_client.py (generated example)
# This command invokes the endpoint and saves the raw JSON output to a file.

aws sagemaker-runtime invoke-endpoint \
    --endpoint-name omegafold-scale-to-zero-20250623-154152 \
    --content-type application/json \
    --body '{"sequence": "MKQHKAMIVALIVICITAVVAALVTRKDLCEVHIRTGQTEVAVF", "num_cycles": 2}' \
    --region us-east-2 \
    output.json

# You can then use a tool like 'jq' to extract the PDB data.
cat output.json | jq -r '.pdb_structure' > structure.pdb
By mastering these client patterns, you can ensure that your serverless ML endpoint can be securely and reliably integrated into any application, from a data scientist's notebook to a production web service or an automated MLOps pipeline.
Monitoring and Production Best Practices
Deploying an endpoint is not the end of the engineering lifecycle; it is the beginning of its operational life. A production system requires robust monitoring, proactive alerting, and adherence to best practices to ensure it remains reliable, performant, and cost-effective over time. This final chapter provides a comprehensive guide to operating your serverless ML endpoint at a production standard.

A Framework for Observability
Observability for a SageMaker endpoint rests on three pillars, all accessible through Amazon CloudWatch:
- Metrics: Quantitative, time-series data about the endpoint's performance and health (e.g.,
ModelLatency,InstanceCount). - Logs: Detailed, text-based output from your inference container, crucial for debugging application-level issues.
- Traces: (For more complex, multi-service workflows) A view of a request's journey across different services. For our single endpoint, this is less critical but is managed by AWS X-Ray if needed.
Key Metrics for a Serverless Endpoint
Your primary monitoring dashboard in CloudWatch should focus on these key metrics.
Navigation: CloudWatch -> Metrics -> All metrics -> SageMaker -> Endpoint Metrics (Filter by your EndpointName)
| Metric | What It Tells You | Healthy State | Alerting Threshold (Example) |
|---|---|---|---|
| InstanceCount | Current number of active instances. | 0 when idle, 1+ under load. | > 0 for > 1 hour (potential stuck instance) |
| Invocations | Total number of requests. | Spikes during active use. | N/A (business metric) |
| ModelLatency | Time spent inside your container. | Stable, e.g., 15-25s. | p95 > 30 seconds |
| OverheadLatency | Time spent in SageMaker infrastructure. | < 1s for warm, ~45s for cold. | p95 > 2 seconds (warm) |
| Invocation5XXErrors | Server-side failures. | Sum = 0. | Sum > 0 in 5 minutes |
| CPUUtilization | CPU usage on the instance. | ~50-90% during inference. | < 10% or > 95% (anomaly) |
| GPUUtilization | GPU usage on the instance. | ~80-100% during inference. | < 50% (potential bottleneck elsewhere) |
Building a Production Dashboard
Your CloudWatch Dashboard should provide an at-a-glance view of the endpoint's health.
Recommended Widgets:
- Single Value:
InstanceCount(current). - Line Graph:
Invocations(Sum, 1-minute period). - Line Graph:
ModelLatencyandOverheadLatency(p95, 1-minute period). - Line Graph:
Invocation5XXErrors(Sum, 1-minute period). - Line Graph:
CPUUtilizationandGPUUtilization(Average, 1-minute period).
This setup allows you to correlate incoming traffic with latency, error rates, and resource utilization, which is essential for diagnosing production issues.
Debugging with CloudWatch Logs
When an error occurs (e.g., a 5XX error), your first destination should be CloudWatch Logs. All stdout and stderr from your container are streamed here.
Navigation: CloudWatch -> Log Groups -> /aws/sagemaker/Endpoints/{Your-Endpoint-Name}
Our structured logging in inference.py becomes invaluable here.
Source: code/inference.py
# A request that fails input validation
logger.error(f"Input validation error: {str(e)}")

# An unexpected model failure
logger.error(f"Inference failed: {str(e)}")
logger.error(traceback.format_exc()) # CRITICAL for debugging
When you see a 5XX error in your metrics, you can immediately find the corresponding log entry with a full traceback, allowing you to pinpoint the exact line of code that failed.
Production Best Practices
1. Infrastructure as Code (IaC) is Non-Negotiable
As demonstrated in Chapter 5, your infrastructure should be defined in code (e.g., CloudFormation or Terraform).
- Why?: It provides version control, peer review for infrastructure changes, and automated, repeatable deployments. Manual changes in the console are untraceable and lead to configuration drift. Your CloudFormation template is the single source of truth for what is running in production.
2. Automate Deployments with CI/CD
A production MLOps workflow automates the path from code change to deployment.
- Trigger: A
git pushto themainbranch. - Pipeline Steps:
- Build & Test Container: Run
docker buildand local container tests. - Push to ECR: Tag the image and push it to your Amazon ECR repository.
- Deploy to Staging: Use the deployment script or CloudFormation to deploy a new staging endpoint with the new image.
- Validate Staging: Run the automated validation suite against the staging endpoint.
- Promote to Production: (With manual approval) Update the production endpoint to use the new, validated endpoint configuration. SageMaker handles this with zero downtime.
- Build & Test Container: Run
3. Use Separate Staging and Production Environments
Never test new models or container changes directly in production.
- Staging Endpoint: An identical, parallel endpoint used to validate changes. This is where you run performance, integration, and regression tests.
- Production Endpoint: The live, customer-facing endpoint. It should only ever be updated to a configuration that has been fully validated in staging.
4. Implement a Blue/Green Deployment Strategy
SageMaker natively supports blue/green deployments for safe, zero-downtime updates.
- Process:
- Your production endpoint (
omegafold-prod) is currently running withProductionVariant-A(using the old container). - You deploy a new Endpoint Configuration for your new container, creating
ProductionVariant-B. - You update the production endpoint, directing a small percentage of traffic (e.g., 10%) to
Variant-B. This is a canary release. - You monitor the metrics for
Variant-Bclosely. If error rates and latency are normal, you gradually shift 100% of the traffic to it. - If issues arise, you can immediately shift 100% of the traffic back to
Variant-A, mitigating the impact. - Once
Variant-Bis handling 100% of traffic, you can safely deleteVariant-A.
- Your production endpoint (
# Conceptual code for a blue/green update
def update_endpoint_traffic_split(endpoint_name, variant_a_weight, variant_b_weight):
    sagemaker.update_endpoint_weights_and_capacities(
        EndpointName=endpoint_name,
        DesiredWeightsAndCapacities=[
            {
                'VariantName': 'variant-A-old-model',
                'DesiredWeight': variant_a_weight,
            },
            {
                'VariantName': 'variant-B-new-model',
                'DesiredWeight': variant_b_weight,
            },
        ]
    )
5. Secure Everything with Least-Privilege IAM
The IAM roles provided in this guide are illustrative. In a true production environment, they should be scoped down to the absolute minimum required permissions.
- Client Role: Should only have
sagemaker:InvokeEndpointpermission on the specific production endpoint ARN. - SageMaker Execution Role: Should only have S3
GetObjectpermissions on the specific model artifact bucket and ECR permissions on the specific image repository.
Final Word: From Model to Mission-Critical Service
This guide has taken you from the initial engineering problem of costly, inefficient ML deployments to a complete, production-grade, serverless solution. By combining robust container engineering with the purpose-built architecture of Amazon SageMaker, you have implemented a pattern that is not only technically elegant but also economically sound.
The principles and practices detailed here—automated deployment, rigorous validation, comprehensive monitoring, and a security-first mindset—are the foundation of successful MLOps. They transform a machine learning model from a static asset into a dynamic, reliable, and mission-critical service capable of delivering value at scale.
This concludes the core guide. Happy deploying!